All Activity
- Past hour
-
@kgallen The only thing I can think of is adding to the release playback (Rx) in the cue macros to allow release cue (Rx/y). Not hopeful it will happen because it would probably involve a lot to implement it.
-
@Sol That seems a nice idea but ye "Cannae change the laws of physics" (or LTP). If you did then everything else would break. @kgallen @Archie D Opinions on that?
- Today
-
I think it would have to be a ‘built in’ effect. The key to this as identified at the start is the ‘release’ instruction the desk needs. I’m not sure even user macros on FLX can make this any easier. Some sort of ‘auto release’ would be needed.
- Yesterday
-
@Sol That seems a nice idea but ye "Cannae change the laws of physics" (or LTP). If you did then everything else would break. @kgallen @Archie D Opinions on that?
-
Thank you so much, @Davidmk, @Archie D, and @kgallen, for your helpful comments and explanations. I really appreciate that you took the time to think through my problem. Special thanks to @Archie D for the very detailed, bullet-proof instructions - they will be helpful! Honestly, I’m also glad to see that this is indeed a difficult task and not just something I failed to figure out on my own 😇 Let's hope that future versions will offer a simpler or more straightforward solution.
-
Just re-reading my initial post it’s a real dogs dinner! I’m glad @Davidmk and @Archie D have brought some clarity to the exercise with the neat use of a chase on the ‘master’ playback. Great work chaps!
-
@kgallen No worries. My post offered no more than a hint, you went further and @Archie D has gone right into the detail. I think, between us, we've covered this at every level.
-
Yea, sorry @Davidmk that’s just my slow brain. I wrote my initial response and thought ‘that’s awful’ and subsequently thought of using the master playback as triggers. Completely forgetting that was what you’d proposed initially… brain like a sieve!
-
Good morning @Sol, Welcome to the Zero 88 Forum! @Davidmk and @kgallen have done an excellent explanation of how to go about solving this with a 'master' playback triggering and releasing other singular playbacks. I would have done it the same way. I'll admit, this is something that should be able to be done easier, but this is unfortunately currently the only way to do so. I've written some guidance below, expanding on the discussed elements in this post, to help you along with this. (Apologies for the colossal message, I have tried my best to cut it down). In the following steps, you'll be programming individual playbacks with one lighting state each for each 'step' of your chaser. As Kevin and David have mentioned, we can then trigger and release these individual playbacks with a master playback (not the regular type of Master Playback with the main GO button though, to avoid confusion) that just has control over these individual playbacks. It's worth noting that the 'master' playback you'll program will be a chase, with the individual playbacks (the 'steps' of the chase) will be one state on each playback. E.g. Playback 10 has fixture 1 and 5 at full white, then Playback 11 has fixture 2 and 4 at full white, with 1 and 5 at zero, then finally Playback 12 has fixture 3 at full white, with 1, 5, 2 and 4 at zero. This creates the singular steps for an effect that will chase in towards the middle. By programming these individual steps onto separate playbacks (the last few playbacks available on your desk are recommended to keep them out of the way), it allows us to individually trigger and release them. When releasing a playback, ZerOS completely wipes it out from the outputs, returning to the underlying data for that fixture (if any at all), allowing fixtures to switch back to your original rainbow gradient. For example, if I have Playback 1 as fixture 1 thru 5 at full white, whereas in Playback 2 fixture 3 is at red - I bring up Playback 1 (all white), then I bring up playback 2 (fix. 3 at red) while keeping 1 at the same place. Fixture 3 will turn red. If I bring down Playback 2 (fix. 3 at red) to zero, fixture 3 will return to the original data it has in Playback 1 (white) as Playback 1 is still raised. Steps for creating each individual playback (acting as each step for the overall chase) Step 1: Bring those fixtures up for the first / next step of your chaser you want to program. Step 2: Put them in the colour 'White' so their colour is tagged. This will differentiate the colour from the underlying rainbow playback. Step 3: Tap 'Record' -> Tap an empty playback's flash button. (I recommend the last few playbacks, and ensure to leave room to place them in order so you know which one does what) e.g. 3 steps I would have Playback 46, 47, 48 with 46 being step 1 and 48 being step 3 (last step). After you've programmed each individual playback (e.g. each step) Step 1: Think about where you want to put your 'master' playback that will start your custom chaser. Pick somewhere which has an empty playback to the right of it (explained later*) Step 2: Ensure nothing is being output from the desk again. Tap 'Record' -> Tap that playback's flash button of where you want the 'master' playback to be. Then do the same for the empty playback to the right. This will record an empty cue on each playback. *The way this will work is the left one of the two playbacks will be the playback to start the chaser, and the right of the two will be the flash button to stop / release it (the whole chaser). Step 3 (repeat as many times as needed): Record an empty cue for each individual playback ('step') you have programmed onto the 'master' playback (left of the two). On the second cue recorded, the desk will show a prompt. Tap 'Create Chase'. The second cue has now been recorded, with the playback converted to a chase. This prompt will not appear for future cues/steps recorded to that playback, as it will just add another step to the existing chase. Step 4: Go to the first cue in this playback (VIEW + Playback Flash Button to view these cues) and tap 'Add' in the 'Settings' column for that cue. Step 5: As David mentions, use Macros -> Trigger Cue Stacks (tap 'Add' next to it) -> Select your individual playback for the first step. Tap OK. Tap OK again. Step 6: For cue 2, you should tap 'Add' in the 'Settings' column again, Macros -> Trigger your second individual playback for the second step, but under 'Release Cue Stacks', put in the previous step (for this - the first individual playback). That's the base of it done for the first two cues. You'll now want to repeat that for each individual playback (acting as each step) you have programmed, ensuring that for cues past the first trigger, you release the previous, and trigger the next. Cue 1 should have the first trigger, and releasing the last playback so when the chase repeats, no steps overlay each other. In the single cue in the playback to the right (the one we will use to stop the chaser all-together that I talked about earlier) - do VIEW + Playback Flash Button -> 'Add' in 'Settings' column -> Macros -> Release Cue Stacks -> Add in all of your individual playbacks. This will release all playbacks when you hit the flash button, stopping them. You can also trigger both of these playbacks in your main cue stack, so you don't have to worry about moving the faders. Note that if your 'master' playback for this chaser effect is still raised or active, then it will just re-trigger these individual playbacks, so when stopping using the playback to the right, ensure the 'master' playback is down. You may notice something odd with the fade timings for each step. To fix this, enter each playback's view like you've done previously (using VIEW + Playback Flash Button) and edit the fade times in the columns to whatever you wish. The console will listen to these fade times when triggering and releasing each individual playback. To set up your 'master' playback for a Tap Tempo, hold SETUP and tap your 'master' playback's flash button -> CHASE tab -> Use Global BPM (tap to get it with a red line to indicate it is selected). Then define an empty playback as a Global Tap Tempo by holding SETUP again and tapping a flash button of an empty playback -> Fader Function -> Global Tap Tempo -> OK. Again, I apologise for the very very lengthy message, but I hope this is relatively okay to understand, please do let us know if you need more help as this is quite painful to do, and many thanks again to Kevin and David for the initial replies! Archie
-
@kgallen @Sol This is what I was hinting at in my response. Great minds eh? It would be good to have a solution because it would look good and, with the variable background colour, so useful for busking. The other way, using a modified sparkle (or other effect) wouldn't be the same and you couldn't use tap tempo to set the speed.
- Last week
-
I’ve read with interest what @Davidmk has written. I agree the key to this will be fixture Release to get back to your background colour. However I can’t as yet think of a neat generic way to do this. All I can think of at present is you will need a set of playbacks equalling the number of ‘white’ lights you want to overlay. Each of these playbacks will light one of those lights. Each has 2 cues. The first cue lights the light and releases the previous playback in the sequence. The second cue triggers the next playback. This ‘next’ playback has the two cues as above, the release being for that first playback. Repeat playbacks like this for each sequence light. You could have a ‘master’ playback that triggers the first playback in the sequence and a second cue that releases all of the sequence playbacks. This is not readily expandable and quite clunky to implement. Also changing the speed will require exiting the cue times on each playback. Yuk. Possibly you could have a master playback that triggers and releases each sequence playback, that would probably make time editing far easier and all the sequence playbacks need to do is light the light. As yet I can’t think of a better way. At least on FLX/S there are no real shortage of playbacks and the sequence playbacks could be buried on a later page. We’ll all keep having a think as this is fundamentally not unusual as a requirement.
-
This is a tricky one. Some years ago I attempted the same thing without much success. The problem is that you are fighting the principles of Last Takes Precedence. When you set the background rainbow that state is "last", if you then set another state (without removing the old one by lowering the background fader) that becomes "last" and remains in control as long as the fader is up. When you lower the new states fader (and as long as Release On Lower is on for that playback - this is the default) it releases that state and the background state becomes the "last" (unreleased) state. This rule applies to chases as well so, as each step executes, it sets a fixture to white and it remains white until the chase fader is lowered and the all steps in it are released. This means that the fixtures turn white and stay that way until they are all white. Normally each step in a chase (e.g. a red/white one) each step sets the new fixture to white and returns the previous (or all other) fixtures to red. But you can't do this because you want the colour from the old state and you don't know what that might be. Your issue then is how to release previous steps in the chase when the next step is executed. Things you can try... You can release things from a step, see Cue Settings -> Cue Macros in the manual https://www.zero88.com/manuals/zeros/cues-playbacks/cue-settings/cue-macros but I think this only works for playbacks not steps in them. Perhaps you could make a chase that triggers a different playback in each step? You could modify a Sparkle effect. You can only do this on an FLX so you'd have to set it up on Phantom ZerOS and then try running it on FLX S. See the manual at https://www.zero88.com/manuals/zeros/effects/waveforms. This is probably your best bet - unless someone else has a good idea. I'll be watching this thread as it's something I'd like to achieve but no longer have the will or time to spend on it.
-
It would be great, but (I think) with the current way that ZerOS draws the 'Panel' desktop/window, it's unfortunately at a fixed size so therefore doesn't scale and make more space in that particular window as you resize the window (I'm using the desktop app in the image below, not the iPad app, so I'm able to rescale the window). Things are quite close together to try and ensure that they are big enough without having to make it all smaller to have more space between each of the buttons. Because there isn't much space, it'd be difficult to add labels as they are on the physical front panel in any free space for that window. The labels would be shown in one bitmap which covers the entire digital front panel, which is the way it's done in Phantom for the Front Panel view, but this 'Panel' desktop is actually inside ZerOS itself and not a separate part of the windows emulator. As a side note - I think this 'Panel' desktop is using the same window that's used for the upper part of Test Mode, it certainly looks like it... Anyway, I hope the Monitor x Remote solution worked out okay, if you have any other questions feel free to ask. Archie
-
Hi everyone, I’m trying to create a color and intensity chaser (either a cue stack or using an effect) that runs on top of a separate, static background color coming from a different playback. Think of it like the built-in sparkle effect, but with custom colors. For example: Playback 1 sets the fixtures to a static rainbow gradient at 50% intensity. Playback 2 adds a white chaser at 100% intensity on top of that. As the chaser moves on, each fixture should return to its original rainbow color and intensity. I’ve experimented with different tracking settings and playback options, but I haven’t been able to get this behavior working correctly. The goal is a flexible busking setup where I can mix and match different background color schemes with separate overlay effects. Any help or pointers would be greatly appreciated. Thanks in advance!
-
 Sol joined the community
 -
They are kinda small - it would be nice if they were labelled too! S.
-
Hi Simon, No worries, please let me know how you get on with this. In addition to my comment - if you find the Panels window buttons on ZerOS Monitor to be too small, try using the ‘Zoom’ accessibility feature on iPad. Archie
-
Hi Archie, Thanks for the reply. That's very sneaky - I like it ! Next rehearsal is Sunday although I may be in the Hall tomorrow so I'll give this a try. Simon
-
Hi @Simonkbike, Are you using the 'Panel' desktop view on Solution (in the ZerOS Monitor app) to attempt to hold the 'Memories' key and tap a playback's flash button? This unfortunately won't work as when you press the desired playback's flash button in the Monitor app, it will move your selected coordinates being relayed back to the console to the flash button, away from the 'Memories' key you were holding down. You'll notice this, by observing that as soon as pressing the flash button on a playback while holding 'Memories', or even just tapping a blank space, the coordinates selection will move there and the 'Memories' key will then be visibly un-held if you look carefully. But then, if you move your finger a slight amount while still on the 'Memories' key, it will re-hold that button as the coordinates being relayed back to ZerOS will be moved back there due to a new touch update. As a solution to this problem: I strongly suggest using an iPhone, Android Phone or another iPad/Android tablet to run the ZerOS Remote app alongside the ZerOS Monitor app on the other device. This will allow you, in ZerOS Remote to navigate to the 'Playbacks' page using the dropdown at the bottom. The numbers you see along the bottom are the flash buttons for the designated playbacks along with their faders, and you can page through these using the 'Down' and 'Up' buttons at the top left, or jump straight to the master GO button with the 'Master' button. To change your currently viewed playback in the Memories window, hold the 'Memories' key on ZerOS Monitor in the 'Panel' window, and tap the playback's flash button on ZerOS Remote. Then, navigate back to Desktop 1 in ZerOS Monitor (or whichever desktop your memories window is kept on), and you'll see that you are now viewing the playback you've just selected using both apps. Even though this isn't a 'perfect' solution, it's unfortunately the best that I can offer. I hope this helps. Kind regards, Archie
-
I'm sure it's buried somewhere but can't find how to do simultaneous button presses on Monitor for iPad. I'm on a Solution desk (but it's not desk specific so I've put the question here) and I want to swap between Playback cue lists on my remote Monitor. On the Solution desk I press-and-hold Memories then press the Go button on the chosen cue stack. The Phantom manuals mention a right-click to hold but that's not an option on iPad, so how do I do this? Simon
- Earlier
-
 Sebastian joined the community
 -
Same here, hazer and house lights are an absolute pain. I sometimes just have to give up with smart tag and use "SELECTED FIXTURES ONLY" if I need to change something whilst people are moving around the house for example. Would love an exclusion feature.
-
Thanx Archie - Yeah I wish I had a ML - but I only got a 24/48. However all is not lost - some redirection and some moding subs and i think i will be ok. Thank you for your input and all your typing :¬) Cheers
-
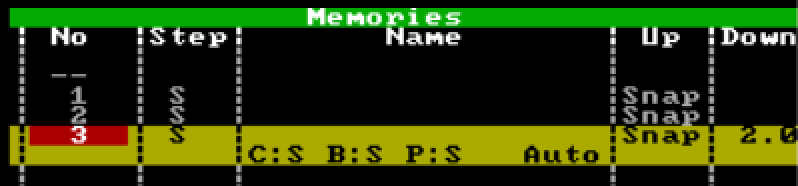
Hi @barefootcoder, I'm assuming you're working on a Jester 24/48, or a 12/24? Unfortunately, this isn't possible on those consoles due to the trigger functionality not being present. You'll simply have to press the GO button twice quickly. However, the answer is different if you are on a console that's on the ML side of things (Jester ML, ML24, ML48). If you are on a Jester ML console, you can do the following: 1. Go to the cue that you'd like to then program addition cues to snap down and fade down. 2. Bring the fixture you'd like to snap down to an intensity of 0. 3. Ensure 'Down' is 'Snap'. Then hit Program to store that cue, after selecting which memory to record to. 4. Now bring the other fixtures down to an intensity of 0. 5. Define a 'Down' fade time. 6. Use the 'Special' tab on the front panel to tap 'Trigger'. This will change it to 'Auto', which will be an instant follow-on from the previous cue. You can then hit program again. In Run mode, after hitting the GO button on the snap-down cue, the fade-all down cue will automatically follow. An example of this is what I've created below, where cue 1 is the state where all those fixtures are up, cue 2 is bringing a single fixture down in a snap, and cue 3 is an auto-follow of a fade of 2 seconds bringing everything else down: I hope this helps.
-
No problem Bob.
-
Thanx keith... something to chew on. Perhaps i will change the direction rather than the execution!.... 🗽🌩🎄🪪❗️❗️ i have the power!! Ha ha ha However I like the snap on subs idea. Thanx 😀
-
Had a quick peruse of the manual. Didn’t see anything about auto-go but I could have missed it. Other option which I’d probably use on my Alcora (Jester predecessor) would be to programme your snap lights onto a sub master and also into your fade cue. At the cue point press and hold the flash button for the sub master and press GO. After the fade up time of the fade cue, HTP will hold your snap lights on and you can release the flash button.