Archie D
-
Posts
112 -
Joined
-
Last visited
-
Days Won
13


Archie D's Achievements
")


-
Hi @Rye, The easiest option here if you were using a full-size FLX would be to use macros. Macros have the ability to capture press and hold events on front-panel buttons, therefore you can record a macro that records key presses (not syntax commands), hold CLEAR and tap the Fader Function button (same as the FLX S Channels/Playbacks button). You could then execute this macro via OSC.. /zeros/macro/1 for example. As you're on FLX S however, the above won't work as user macros are not a feature of FLX S consoles. There isn't an OSC command to release all playbacks, so you're right - you would have to release each one with its own individual network cue. To simplify operation though, you could make each network cue follow on from the previous one so you can trigger the first playback release network cue and each playback (1-96) gets released at the same time. If you were using QLab, this could be done with a group cue instead. I hope this helps. Archie
-
Silly me - yes, that of course could have been a possibility. Probably was unstable in some way, making the main console drop out so the backup took over as the main was considered 'offline'. Fantastic to hear your main FLX didn't crash. Anyway - I hope the show went well, great pic!
-
Hi Martin, No problem - let me know how you get on. Archie
-
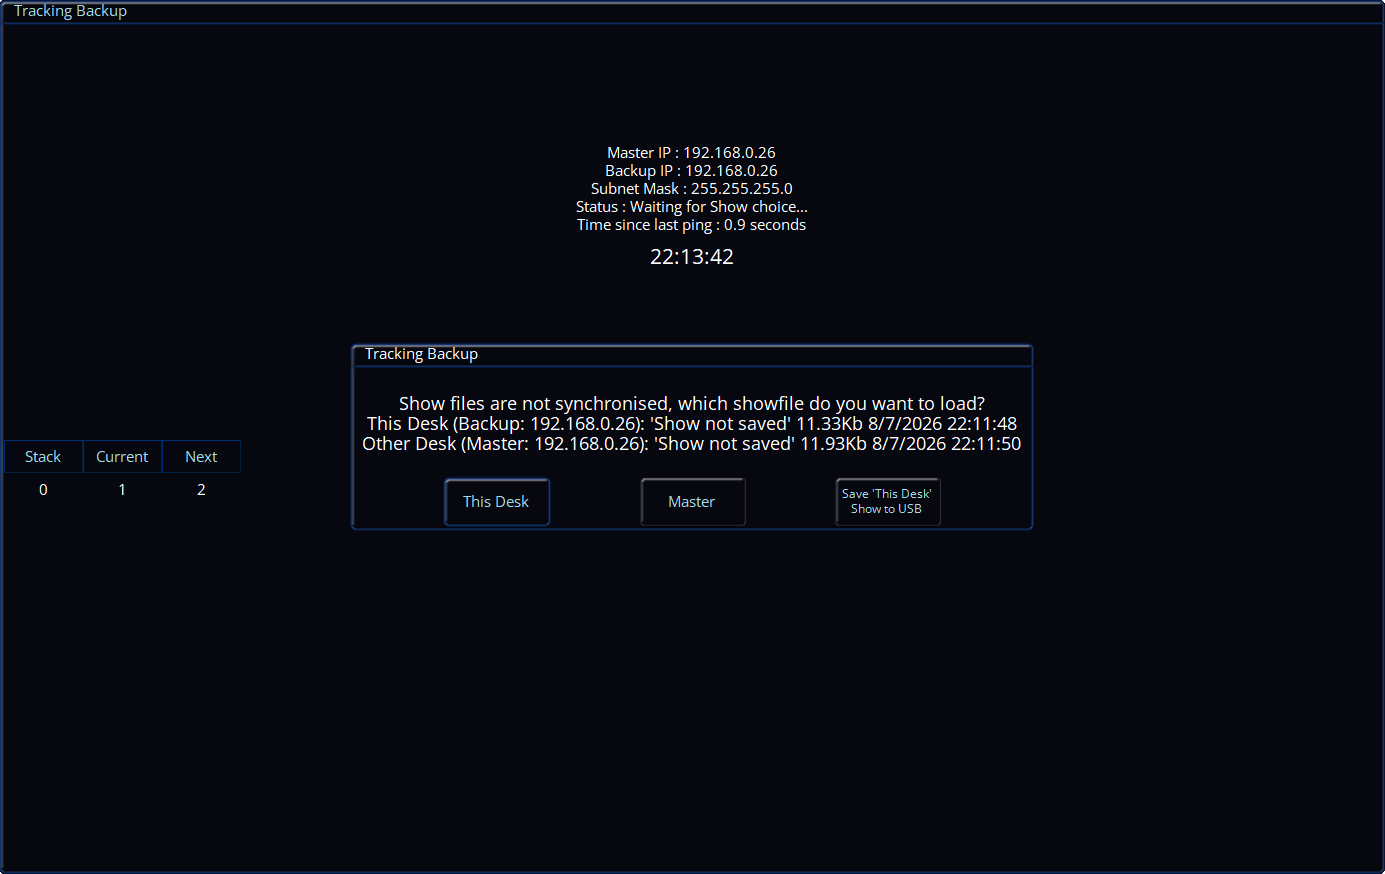
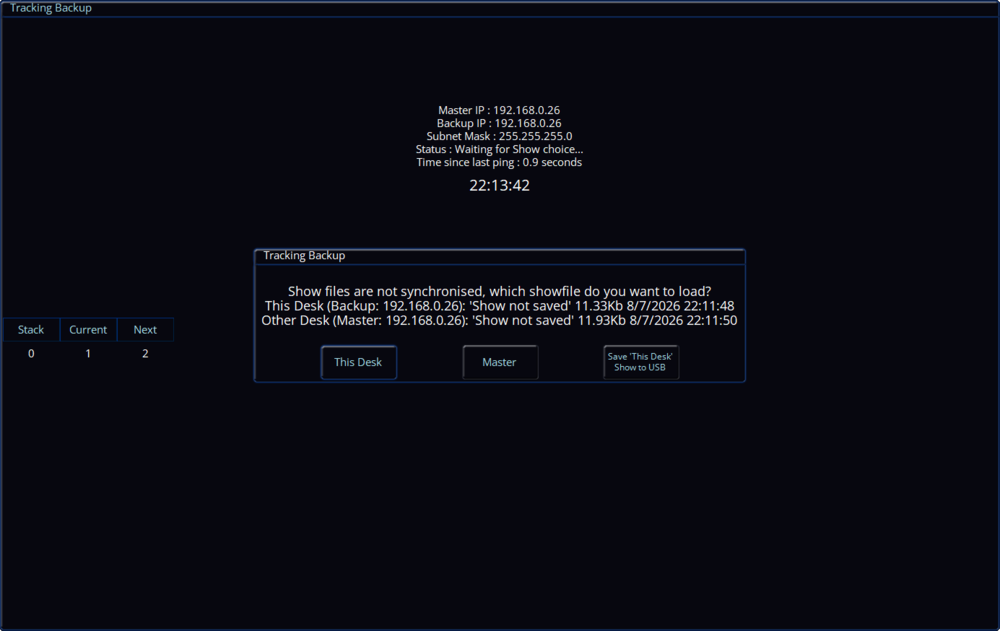
Hi @scottydog75, Tracking backup ensures that the master and backup desk(s) are synchronised - so when an update is made on the master desk (e.g. a cue is recorded, a playback is raised), it is automatically transferred to the backup desk without any prompts. Therefore, making edits to the showfile on the master desk shouldn't force the backup desk to take over. You'd get a prompt (as seen below) asking which show file you want to use when taking back control on the master desk if the backup desk has already taken over, along with the ability to save the current showfile on that desk to a USB storage device. At the time, were you using DHCP, or did you assign the desks static IP addresses? Perhaps something was conflicting with the master desk using static IPs, meaning the master desk couldn't acknowledge the backup desk to say 'Yes, I'm still here!', therefore the backup desk took over? Or, perhaps some packets were lost over the network and again, the backup desk couldn't pick up that the master desk was still alive...
-
Hi Martin, The only BIOS section which pops out to me regarding this issue is Advanced > Display Control. The settings are as follows: Display Mode: [CRT+LFP] Flat Panel Type: [XGA 1x18] Flat Panel Scaling: [Stretched] If those settings are already as listed, it may be a dodgy connection internally to the Monitor 2 VGA port causing a colour to not be output, giving you an image without the correct colours. If you're confident in opening the desk, it would be worth checking this. I hope this helps. Archie
-
Hi @Martin J, I'm fairly confident that Frog2 and Orb Series consoles have the same BIOS as each other, so when I'm home I'll make a list of all the BIOS settings for you. Failing that, some soldered connections on the VGA connector itself for monitor 2 may be faulty, therefore not giving all colours on the display output. The VGA port has individual pins for Red, Green and Blue colours, so one of those might be causing the issue you're experiencing. Archie
-
Hi @O Thompson, You probably found that this was because SmartTag was enabled in the Record Options window. Recording home values worked fine, but default values did not because SmartTag ignores fixtures with zero intensity. Your home values had the fixtures at an intensity higher than zero, therefore they were included in the record operation. Another solution to not seeing your fixtures move when your playback is raised is by viewing the playback settings (SETUP + Playback Button) -> Button Function -> Go (Snap) -> OK. Now, you can tap the playback's button to prep your fixtures (position, beam, shape and colour) and then raise the fader to bring intensities up. If you wish to preserve the current setting for button function, you can instead change the shifted button function (what happens when you hold SHIFT and tap the playback's button). To do this, hold SHIFT while tapping the new button function. Now, hold SHIFT and tap the playback's button to prepare your fixtures. If you wish to use this method instead (it allows for multiple different positions of fixtures with lots of playbacks), you can restore your fixture's default values to their default values by selecting them and tapping DELETE -> Home -> Default. I hope this helps. Archie
-
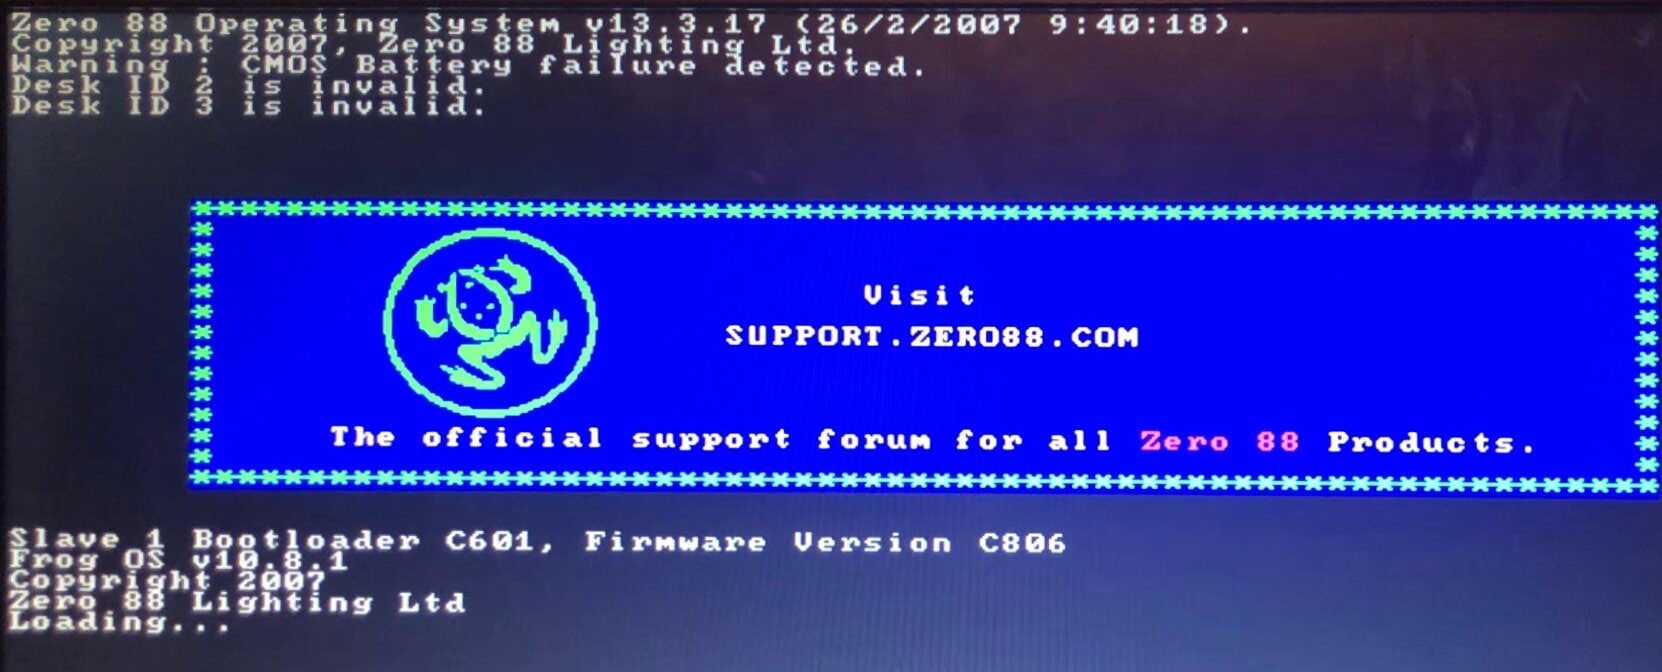
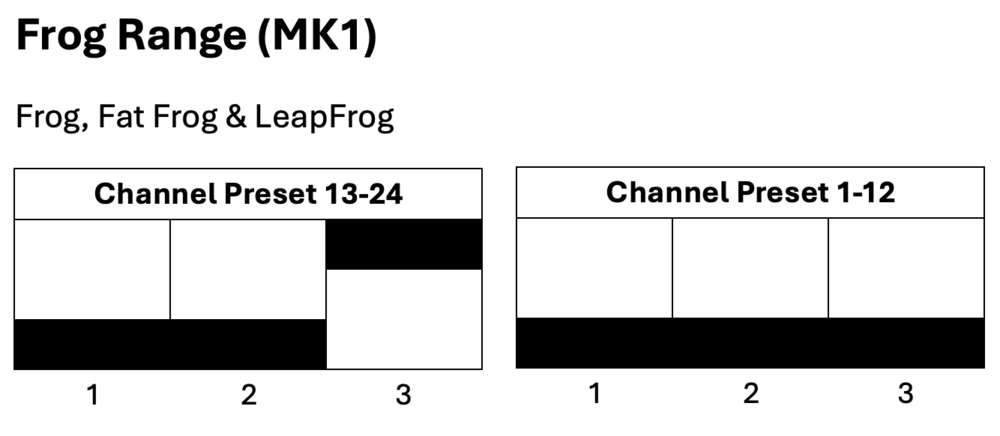
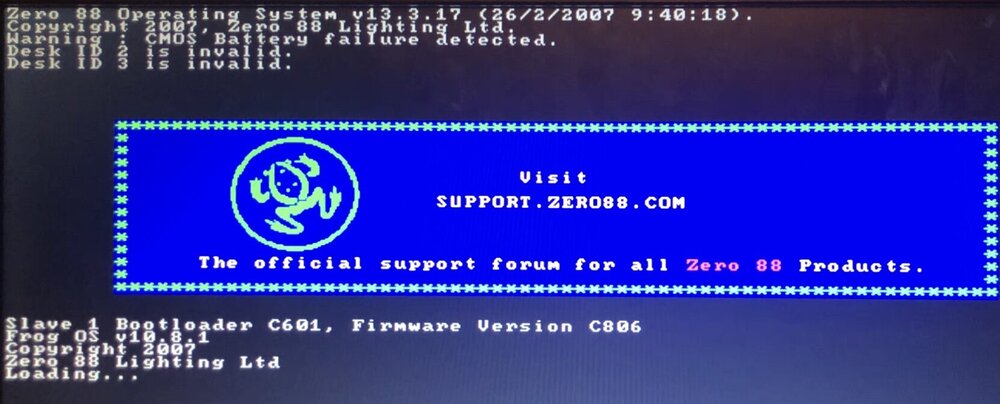
I agree with kgallen, this is most likely a battery issue. The battery is what holds the date and time along with the showfile data, so once the desk loses power it loses those if no battery is present. The time then resets and counts up from zero when powered on each time. Are you getting a message on the external monitor saying 'Warning : CMOS Battery failure detected.'? Following kgallen's advice - without attempting to reinstall the Frog Software, try powering on with a fresh battery and let the desk load into the memories screen, then cut power and turn on again. You should find that if the battery has been installed correctly, the second restart shouldn't show the 'Desk ID <number> is invalid.' message. As far as I know with the dipswitches on the channel fader PCBs, they are only used to tell the desk software which board is which. However, it would be a good idea while you've got the desk open to check they are in the correct position anyway. I hope this helps.
-
I've been running DMX out of Phantom ZerOS 8.0.1, and seems stable. Haven't experienced any crashes with regular daily use.
-
zeros functionality question for Solution
Archie D replied to Ed75's topic in Solution & Solution XL
Hi Paul, Yes - this is correct. My apologies, I should have mentioned that you'd need to delete the dimmer fixture already there. Worth noting, as a shortcut to delete all fixtures numbered 1-48, you can type 1 THRU 48 DELETE ENTER while in the Fixture Schedule tab of SETUP. The shortcut for THRU is '>' on a keyboard. Any further questions please feel free to ask. Archie P.S. they're not in the garage... they're all in the house... I may have to move out soon! -
zeros functionality question for Solution
Archie D replied to Ed75's topic in Solution & Solution XL
Hi @Muller Light, You can patch your RGBW fixture onto the faders by assigning it a fixture number of 1-48 (or 1-96 if using a Solution XL), and the fader will control the intensity. To control colour, the fixture must be selected. Solution consoles don't automatically select fixtures when channel faders are raised like FLX and FLX S consoles do, so you would need to select it manually. You can turn the channel flash buttons below the faders into fixture select buttons via SPECIAL -> Channel button mode -> Select. This replicates the behaviour of the select buttons on FLX and FLX S - tap to select, tap again to deselect. The button's yellow LED will illuminate when that fixture is currently selected. Once the fixture is selected, you can control the colour in the same way as fixtures that are on the MFKs. Hope this helps, Archie -
JesterML LCDs blank [still backlit] and MFK lcd top row malformed
Archie D replied to Archie D's topic in Jester Range
Don’t apologise - life gets in the way sometimes! I hope they’ve managed to sort the intermittent fault out. My JesterML had a ribbon cable that looked like the legs of the components on the front panel had pierced part of it. On the Blue Room, I assisted someone else identifying an issue with their front panel on a Jester 24/48. Their ribbon cable was pierced too. Seems like it might be a common thing? But not sure. Possibly could be solved by carefully cutting the component leg just below the solder joint while leaving a little bit of leg left, shortening the spike. That way the ribbon cable hopefully won’t suffer. -
JesterML LCDs blank [still backlit] and MFK lcd top row malformed
Archie D replied to Archie D's topic in Jester Range
Update time! The issue has been coming back intermittently. Rather late, but tonight I have just replaced the ribbon cable between the processor board and front panel with one which came out of my spare Juggler (has the same FC-26P connector). Will be monitoring how it does over this week and if the buggy LCD issue arises again. Will post progress on the issue. -
Hi Zulu, No worries - fantastic to hear everything’s working as intended now. Best of luck with your show! Archie
-
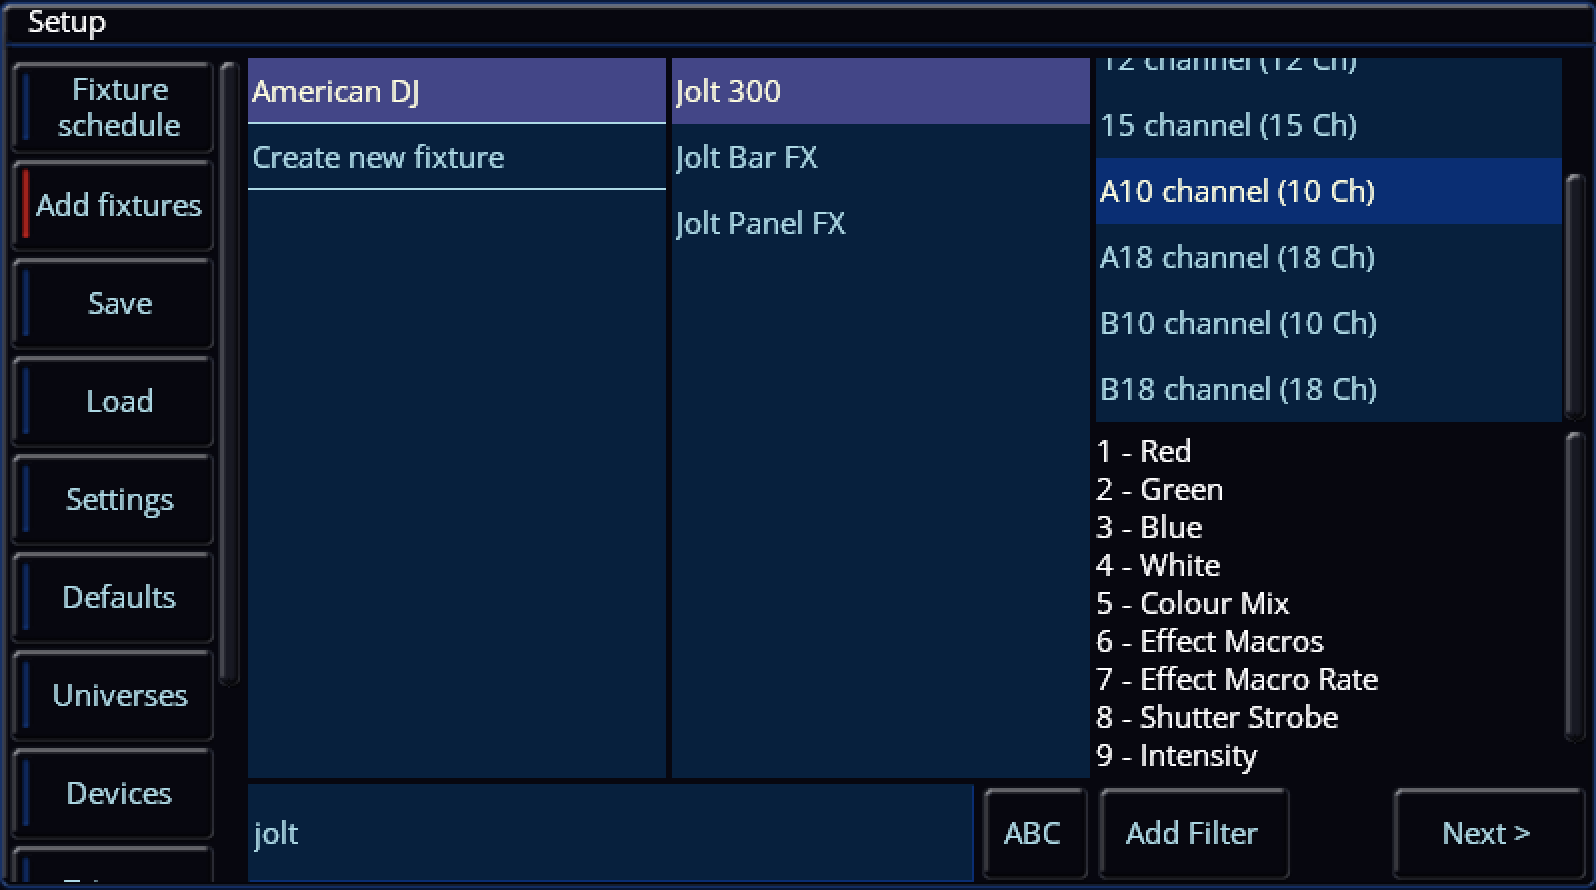
Hi @Petera, The ADJ Jolt 300 is available in the ZerOS Fixture Library on the console, therefore you won't need to match the channels to another fixture in the library. Archie