Archie D
-
Posts
87 -
Joined
-
Last visited
-
Days Won
11
Everything posted by Archie D
-
Hi Ian, That's great news, glad to hear you got it sorted. Have a good day, Archie
-
Hi @Ian_p, Please could you upload your showfile here? We may then be able to figure out if it's a problem with the fixture itself, or if the fixture has some funny channel on it in the profile causing this erratic flashing behaviour, thank you. The previous 'Edit Fixtures' window to see and change defaults of fixtures was removed in ZerOS 7.9.3 in favour of the new Fixture Schedule section of SETUP. To see a fixture's defaults, you could select the fixture(s) and page through the different attributes and see each individual parameter value on the internal touchscreen of FLX S.
-
Good afternoon @Richard Elv, You can purchase a Phantom ZerOS Unlock Dongle from one of the distributors, or from here on StageGear. For outputting DMX with Phantom ZerOS, the Unlock Dongle must be plugged into your computer. If it is unplugged, DMX output will stop until the dongle is present again. Regarding methods of actually getting DMX out of your computer from Phantom ZerOS, you have two options. The first, is to output over the network using protocols such as ArtNet or streamingACN. The second, using a USB to DMX device (ones which support the ENTTEC protocol). Personally, I recommend the ENTTEC DMX USB Pro, which is generally considered to be a very high quality device and can be configured straight from ZerOS in SETUP -> Devices. Each of these devices will output one full universe of DMX. When running Phantom ZerOS as a FLX, you have access to 16 full universes of DMX (8192 DMX channels) over 64 patchable universes. If you're already used to using FLX, using a Phantom ZerOS Unlock Dongle will be ideal as it will give you the front panel you are already familiar with - just virtually. This can be used with a touchscreen, along with the external monitor for multi-touch functionality. Yes, the ZerOS Wing can be used with Phantom ZerOS running on a PC via USB as if you were using it with a physical console, therefore you will be able to use it across both your FLX and Phantom setup. Using a ZerOS Wing is the best option to give you more faders at one time. I hope this helps, Archie Bonjour @Richard Elv, Vous pouvez acheter une clé de déverrouillage Phantom ZerOS auprès de l'un des distributeurs ou directement sur StageGear. Pour la sortie DMX avec Phantom ZerOS, la clé de déverrouillage doit être branchée à votre ordinateur. Si elle est débranchée, la sortie DMX s'interrompt jusqu'à ce qu'elle soit reconnectée. Pour récupérer le signal DMX depuis votre ordinateur avec Phantom ZerOS, deux options s'offrent à vous. La première consiste à utiliser le réseau via des protocoles tels qu'ArtNet ou streamingACN. La seconde, à utiliser un convertisseur USB vers DMX (compatible avec le protocole ENTTEC). Je recommande personnellement l'ENTTEC DMX USB Pro, généralement considéré comme un appareil de très haute qualité et configurable directement depuis ZerOS dans le menu CONFIGURATION -> Appareils. Chacun de ces appareils génère un univers DMX complet. Lorsque Phantom ZerOS est utilisé comme FLX, vous avez accès à 16 univers DMX complets (8192 canaux DMX) répartis sur 64 univers patchables. Si vous utilisez déjà FLX, l'utilisation d'une clé de déverrouillage Phantom ZerOS sera idéale car elle vous permettra de retrouver virtuellement le panneau avant que vous connaissez déjà. Vous pourrez l'utiliser avec un écran tactile, ainsi qu'avec un moniteur externe pour une utilisation multitouch. Oui, la ZerOS Wing est compatible avec Phantom ZerOS installé sur un PC via USB, comme si vous l'utilisiez avec une console physique. Vous pourrez donc l'utiliser à la fois avec votre configuration FLX et Phantom. L'utilisation d'une ZerOS Wing est la meilleure solution pour disposer de plus de faders simultanément. En espérant que cela vous soit utile, Archie
-
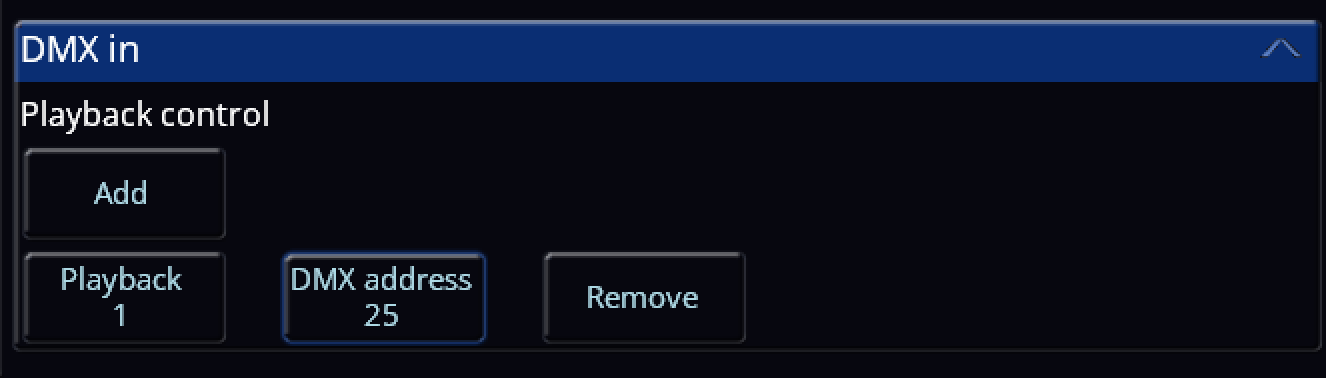
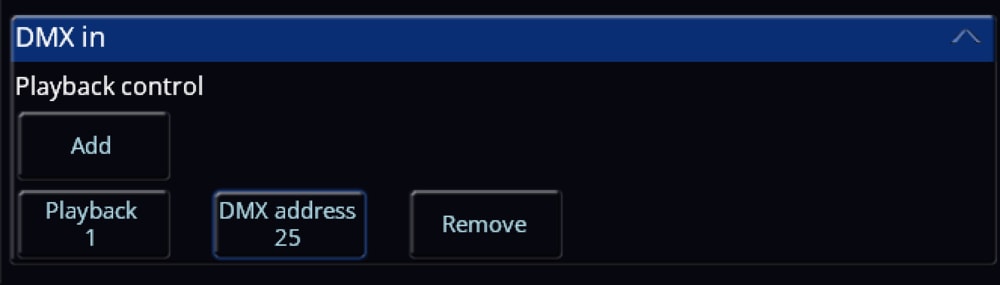
Hi @Richard Elv, Welcome to the Zero 88 Forum! Ultimately, it is highly recommended to use a ZerOS Wing to expand the available faders that can be used at one time on your console. However, using another console such as the FLX S24 is possible, but quite limited in comparison to a Wing. For instance, with this method, when you bring up a fader of a fixture on the FLX S24, it won't automatically be selected on your main FLX console, whereas on a Wing it interacts with the console and does select it automatically (depending on the 'Auto select channels' setting in SETUP -> Settings -> Operational -> Auto select channels). You also won't be able to do record, delete, SETUP + Tap playback button etc using the method described below, DMX Input. For using a FLX S24, you will need to configure one of your DMX output ports on the main FLX to be a DMX input instead. To do this, go to SETUP -> Universes, and tap 'DMX in' on the DMX output you wish to be a DMX input instead. On the FLX S24, you can patch in a bunch of dimmer channels (I recommend patching in the maximum available on ZerOS 8.0, which is 96). Then, connect the first DMX output port on the FLX S24 to your defined DMX input on the main FLX. You will need an adapter for the correct XLR connector to link the consoles together as they are both female XLR outputs. After this has been done, you now have a 'DMX In' column in your Fixture Schedule within SETUP. This lets you define a DMX In address for each individual fixture patched in, so when the console receives DMX data from the defined DMX input port (e.g. I raise channel 1 on the FLX S24 which has DMX address 1 -> FLX receives that data -> Fixture 200 in the FLX has a DMX input address of 1 -> Fixture 200's intensity raises), it will respond as configured. For playbacks, you can set a playback's DMX input address via SETUP -> Triggers -> DMX In. From there, you can tap 'Add' to add a playback to configure ready for DMX Input. In the example below (image attached), I have set Playback 1 on a FLX to be raised and lowered with DMX input address 25 coming from a FLX S24. I have done this so my first page of dimmer channels on the FLX S24 control fixtures, whereas the second page controls playbacks. (1-24 fixture control, 25-48 playback control). If you wish to use the Channels/Playbacks switcher button on the FLX S24, you could set up 96 dimmer channels (4 pages of dimming), use the first 72 (3 pages of dimming) as fixture control, but individually record each of the remaining 24 dimming channels at full as a playback each (playback 1-24), and on the main FLX you set the DMX Input address for each of your playbacks to the last page of dimming on the FLX S24. If you require control of more than 24 playbacks, you could go back further than the last page of dimming and use some of the third page too of the FLX S24. Overall, the ZerOS Wing has been designed to interact with the FLX or any other ZerOS console, and was produced for the reason of adding extra faders that can be used at one time. Using DMX Input is rather limited, so my recommendation is to use a Wing. But, I hope this helps, and if you have any further questions please don't hesitate to ask. Apologies for not translating, I figured if I did then this message would be colossal. Archie
-
I've done some digging, and it appears in the Chauvet P5 manual that they mention "The LEDs will automatically shut off after 60 seconds of sustained output. Reset the dimmer to re-enable LED output", indicating you'll need to take the dimmer channel of the fixture (CH15) to zero and back up again in order to re-activate the LEDs. I understand that you're using a Chauvet P7, but I'm thinking that this behaviour might cross over to the P7 too and just wasn't mentioned in the manual perhaps? Hope this helps advance this further. Archie
-
Hi @DSUK73, Welcome to the Zero 88 Forum. Using a Phantom ZerOS Unlock Dongle unlocks the maximum amount of channels available for the fully upgraded console you are emulating (e.g. emulating a FLX will give you 8192 channels = 16 universes, emulating a Solution will give you 2048 channels = 4 universes). Any USB to DMX device that supports the ENTTEC protocol should work with Phantom ZerOS, I personally use the ENTTEC DMX USB Pro and have two of them. Each ENTTEC DMX USB Pro device will output a single universe of DMX. You can, of course, output DMX over Ethernet via your computer's network port for less cabling out of your PC if you have an Ethernet gateway. Once the USB to DMX device is plugged in, it can be configured in SETUP > Devices. This allows you to set the universe being output on that device, output rate, etc. Purchasing an Unlock Dongle is a great investment and I highly recommend it. I hope this helps, let me know if you have any questions. Archie
-
Ah - after re-reading my post I realised I mis-interpreted part of your post! I apologise. But yes, that would definitely work loading the FLX S show file into Phantom ZerOS and editing it while emulating a FLX console to create a user macro. The only thing you'd run into is once loading the show file into the FLX S, re-saving it and then needing to create another chase later down the line, you'd need to re-construct the user macro again on Phantom as it originally won't have been loaded in to the FLX S. If the chase is in the same arrangement as before, I suppose you could copy the chase and just track through a colour change of the fixtures in each step.
-
Just for clarification, when loading a show file containing User Macros into a FLX S console, they will be disregarded and not transferred over. Hope this helps. Archie
-
Just putting what I posted on the Zero 88 Users Group here in case anybody needs a solution to the same problem.
-
Hi Peter, I've just replied to your post on the Zero 88 Users Facebook Group. Give it a go and let me know how you get on. Archie
-
Fantastic to hear it is working. Please feel free to ask any more questions if you have any. Archie
-
Hi @CestM0i64, In ZerOS, Playback 0 is the master playback, so using OSC (e.g. /zeros/cue/go/0/20) will go to cue 20 in the Master Playback. Therefore, Playback 1 will be go/1/<cue number>, and so on. Hope this helps, feel free to ask any more questions you may have. Archie
-
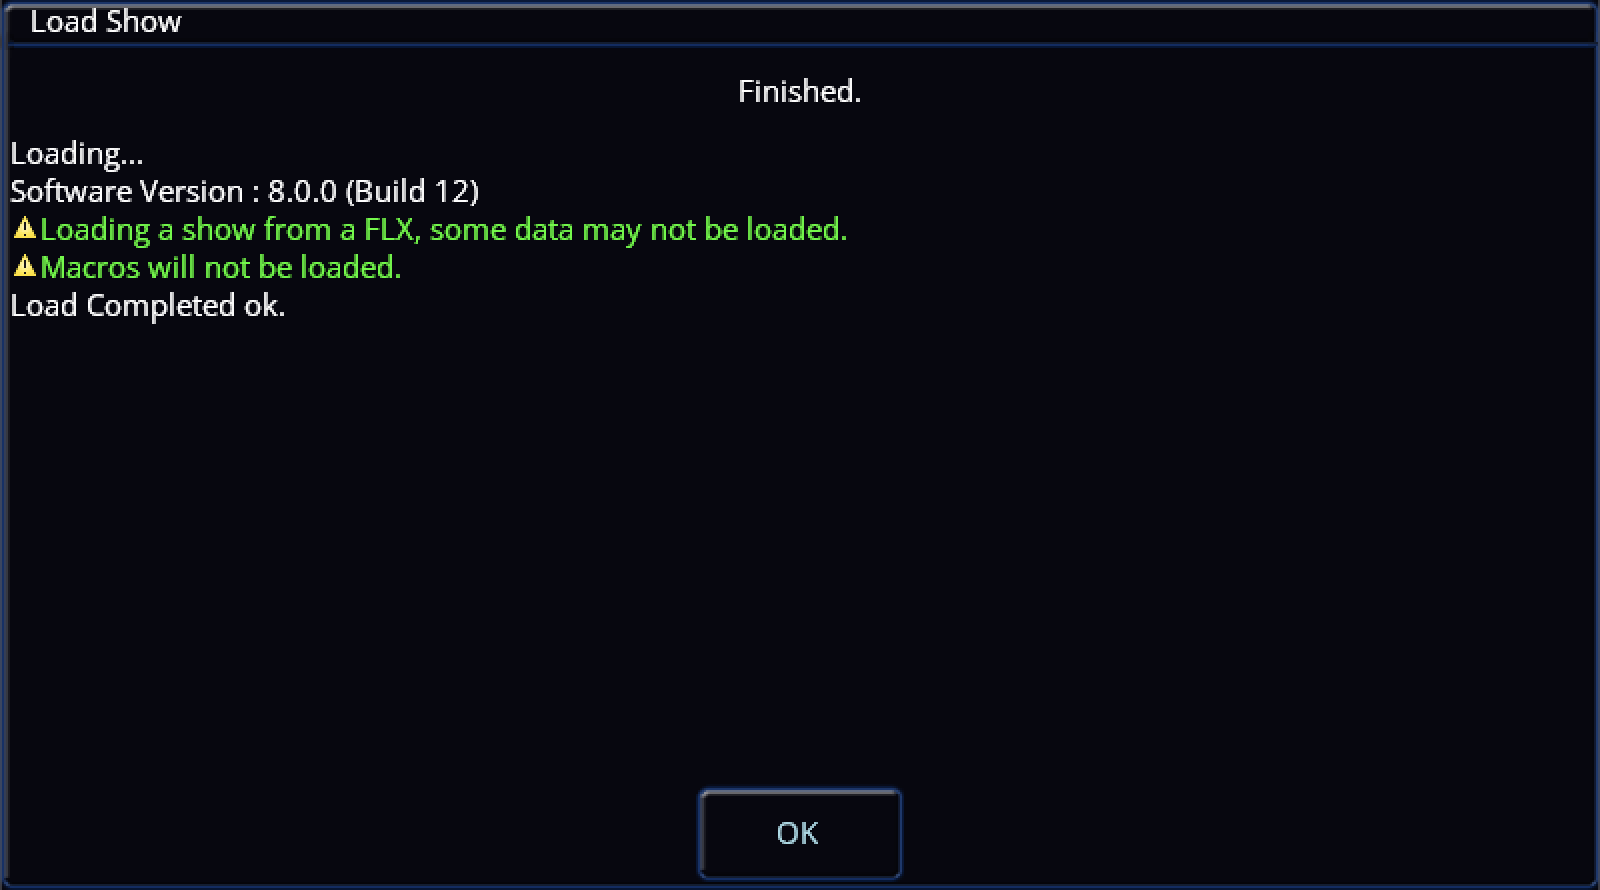
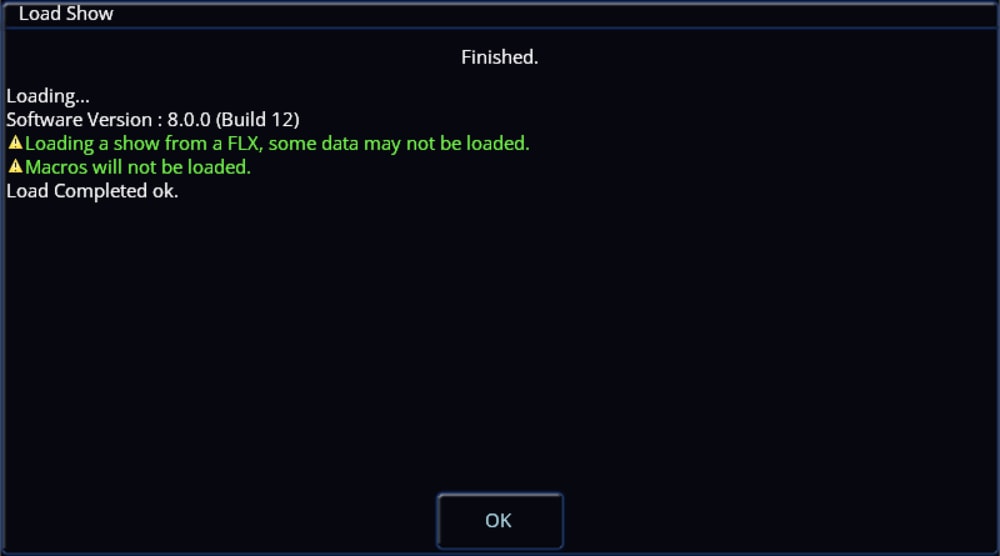
Ever since acquiring my Frog 2, I noticed that with the Dockhouse (Capture) Demo Presentation show file for ZerOS (available from Zero 88 here), it is of course a .zos file. The change from .isf to .zos for show files was made in ZerOS 7.9.8, a version of which is after 7.8.2.39 (the last supported software version for Frog 2) meaning Frog 2 only loads show files saved with the .isf extension. This means my fellow Frog 2 users won't be able to use the Capture Demo File for learning or having a play/experiment, so I have "converted" the .zos show file to .isf in order to be compatible with Frog 2. I imagine the audience for this won't be too large anymore since I feel Frog 2 popularity has died down significantly, but I'm posting this as a public resource in case it is of use to anybody who still uses a Frog 2 or a console on a version of ZerOS before 7.9.8. When loading in the show file, you'll be told it was from a Frog 2 and that some data won't be loaded. There shouldn't be any reason that some data won't be loaded with the way I've done this, but if you are loading this file onto a Frog 2, UDF 1 (User Defined Fader) will have a stored state on it. If loading this onto a different console type without UDFs (e.g. Solution), this should be transferred onto playback/submaster 1 (theoretically). It is also worth noting that this .isf show file is only within the limitations of Frog 2 - meaning the other higher universes found on the .zos version won't be seen or usable (Universe 5 & 6). The attached show file loads with the newer ZerOS skin if on Frog 2 - other consoles have that skin by default regardless, to provide a familiar user interface appearance to the other consoles people may have used with capture in comparison to the light grey and green classic theme on Frog 2. I have tested the .isf file with the Zero 88 provided Dockhouse 2022 file designed for the .zos version and it does work correctly. Anyway.. here's the show file, hope it is of use. Z88 Capture Dockhouse v7-8-2-39.isf
-
- 2
-

-
Save solution files for use on Leapfrog48?
Archie D replied to Muller Light's topic in Solution & Solution XL
Thank you for this information, it definitely sounds like ZerOS Watchdog kicked in while loading the show file. It would have displayed a list of registers and then also a stack trace. Archie -
Save solution files for use on Leapfrog48?
Archie D replied to Muller Light's topic in Solution & Solution XL
Hi Paul, Saving the setup within the show file as well theoretically shouldn't cause any problems. If you can recall - when the console crashed, was it a black screen with a load of white text (ZerOS Watchdog kicking in) or did the console just completely freeze, preserving monitor output too? Let me know how you get on later with LF48TEST1.zos, it has a few things disabled/removed to see if anything in the show file itself is crashing the LF48. One of my theories for this was that because the Leapfrog 48/96 came with 2 DMX universes as standard, with an optional upgrade card while the Solution comes with 4 universes straight from the factory, that ZerOS was trying to index a universe from the Solution (3 & 4) that didn't exist on the Leapfrog when loading in the show file (if the optional upgrade card for 2 more outputs isn't present). Hence, U3 and U4 are disabled in that show file. However, it is just a theory and could be wrong. It's all about experimentation to see what works! I look forward to hearing from you, thank you. Archie -
Save solution files for use on Leapfrog48?
Archie D replied to Muller Light's topic in Solution & Solution XL
Hi Paul, Thank you for providing your show file. Please could you see if this file loads into your Leapfrog 48? If it doesn't and the console crashes, what does the console show on the external monitor? Please don't panic that your cues/playbacks are missing by the way for this file - I'm simply juggling things to see what does what. Thank you. LF48TEST1.zos -
Save solution files for use on Leapfrog48?
Archie D replied to Muller Light's topic in Solution & Solution XL
Hi Paul, Sounds good, if you’re still experiencing difficulties tomorrow, please could you upload your showfile here if that’s okay? I can then see if I can potentially find anything on PhantomZerOS and my Solution XL (though if it loads fine onto a Solution and not the Leapfrog 48, I might be lost) When the Leapfrog 48 crashed, was it a ZerOS Watchdog message that appeared? I’m curious as to what it said, or what the crash behaviour was like.. Thank you and have a good rest of your day. Archie -
Save solution files for use on Leapfrog48?
Archie D replied to Muller Light's topic in Solution & Solution XL
Hi @Muller Light, ZerOS showfiles are cross-compatible between ZerOS-based consoles, only with some data not being loaded (for example when you load a FLX showfile into a Solution, some data from the FLX won’t be loaded in). However, this won’t happen because Leapfrog 48 and Solution are identical, you’ll only receive a warning due to the different console types, but all data will be passed over. What software version are both of your consoles running? To see this, in the Output Window click ‘Other Windows’ (top left) -> System Information -> Software Version. What format is your showfile? Is it a .isf, or .zos? Many thanks, Archie -
Hi Simon, To adjust cue delay times on Solution, the best method is to use the MFKs (Multi Function Keys) instead of the encoder wheels. Navigate your cursor using the mouse or arrow keys to an 'Up' or 'Down' field, then tap ENTER to start editing the time. On the top right MFK, tap 'Delay'. It will now have the red LED lit, with the white background to show it is selected. Type in a time using the MFKs or an external keyboard, then hit ENTER again to submit this. For your instance editing the 'Down' field, the down delay has now been applied to your cue. You also have the option to do this at the same time when editing a regular up or down fade time for a cue for efficiency. When editing a fade time, simply switch between 'Delay' being selected or not, and when pressing ENTER to submit these changes, both changes for the regular fade time and the delay time will be applied in one go together. I hope this helps, feel free to ask any other questions you may have. Archie
-
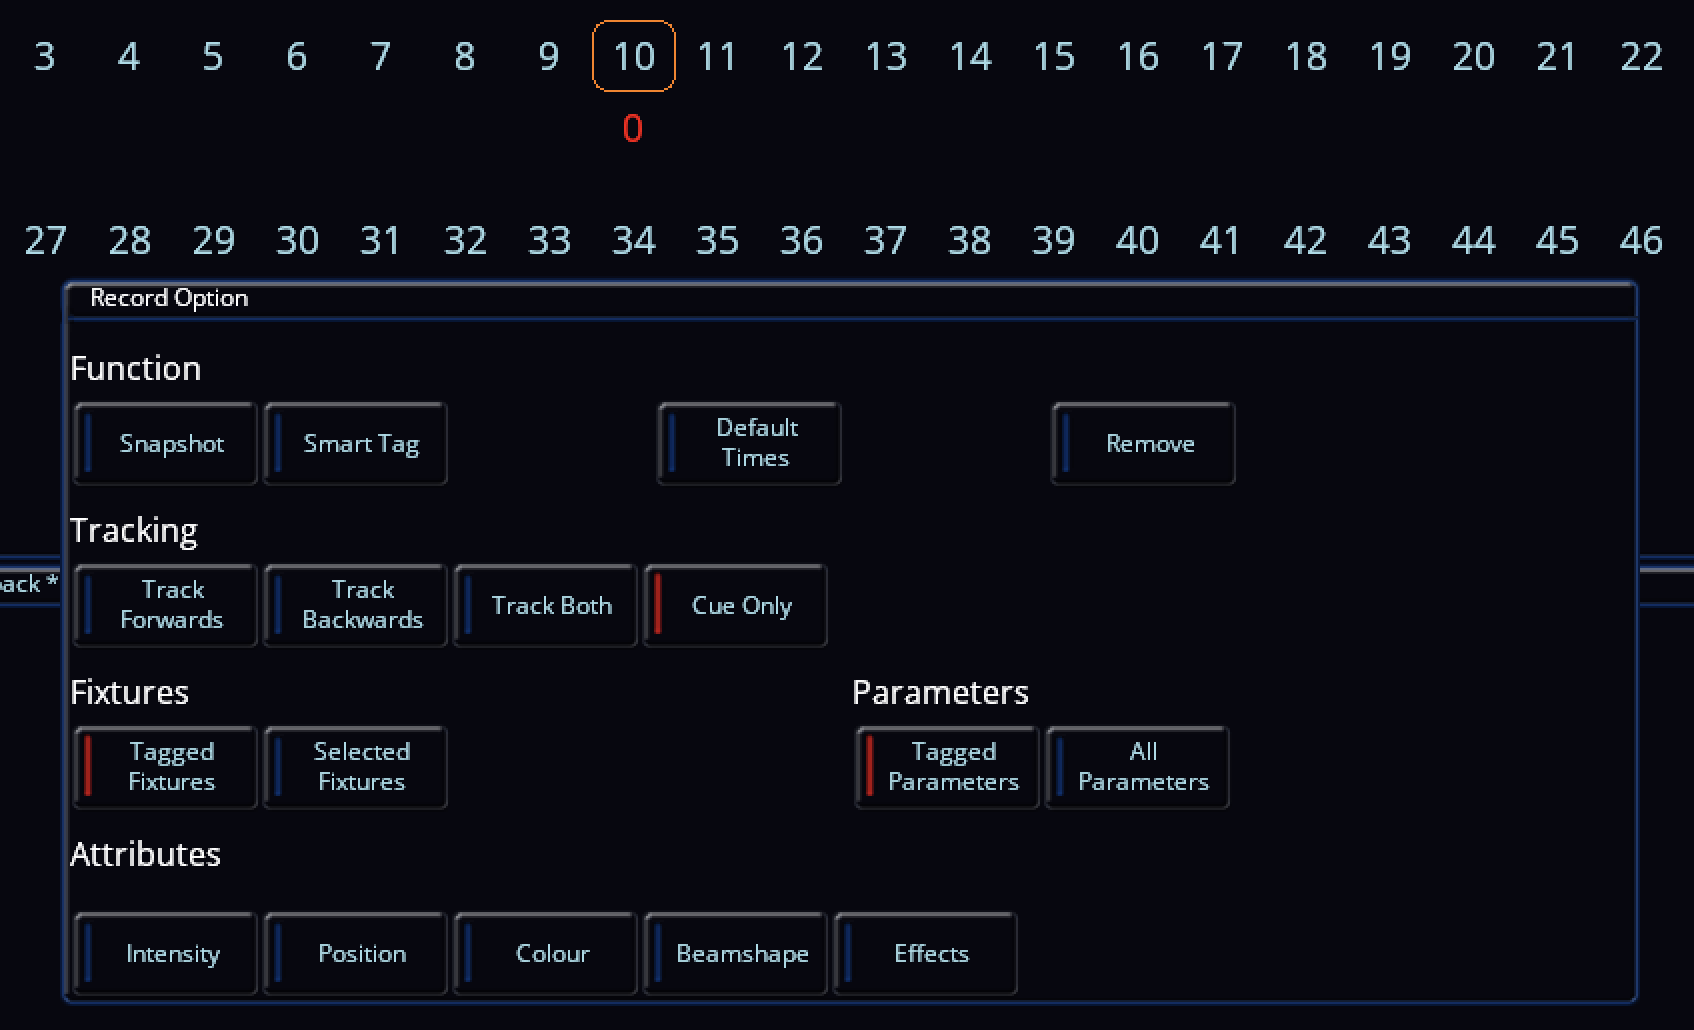
Hi Simon, Good to hear it seems to have fixed itself. I've just popped in to leave a few comments. You may have accidentally knocked the intensity encoder wheel slightly when making changes, so when re-recording default values with RECORD -> HOME -> Default, the intensity information is also included in the defaults of the fixture. Were you using RECORD -> HOME -> Default to do this after changing the intensity to 0%? This next bit is unlikely, but did the 'Intensity' selection button have a red indicator instead of blue? If it was blue, that intensity information won't be recorded into the defaults, so when you CLEAR CLEAR, the fixture will still go back to the original intensity default value. An image is attached with 'Intensity' under 'Attributes' having a blue indicator. The reason I say this is unlikely is because when you make a change (intensity in this case), when tapping RECORD, the changed parameters (which are therefore tagged) will be automatically in red to show they are selected. Though with this being said, in the image you have provided while trying to change fixture 5's intensity back to 0, 'Intensity' has a red indicator... Correct - the yellow D in 'Sources' as opposed to 'Intensities' indicates the intensity is coming from a default value of that fixture. A red P in 'Sources' indicates a manual programmer adjustment or modification. All in all, it is sorted, but I just thought I'd provide little segments of extra information in case anybody reading this isn't sure. Have a great week Simon. Kind regards, Archie

-
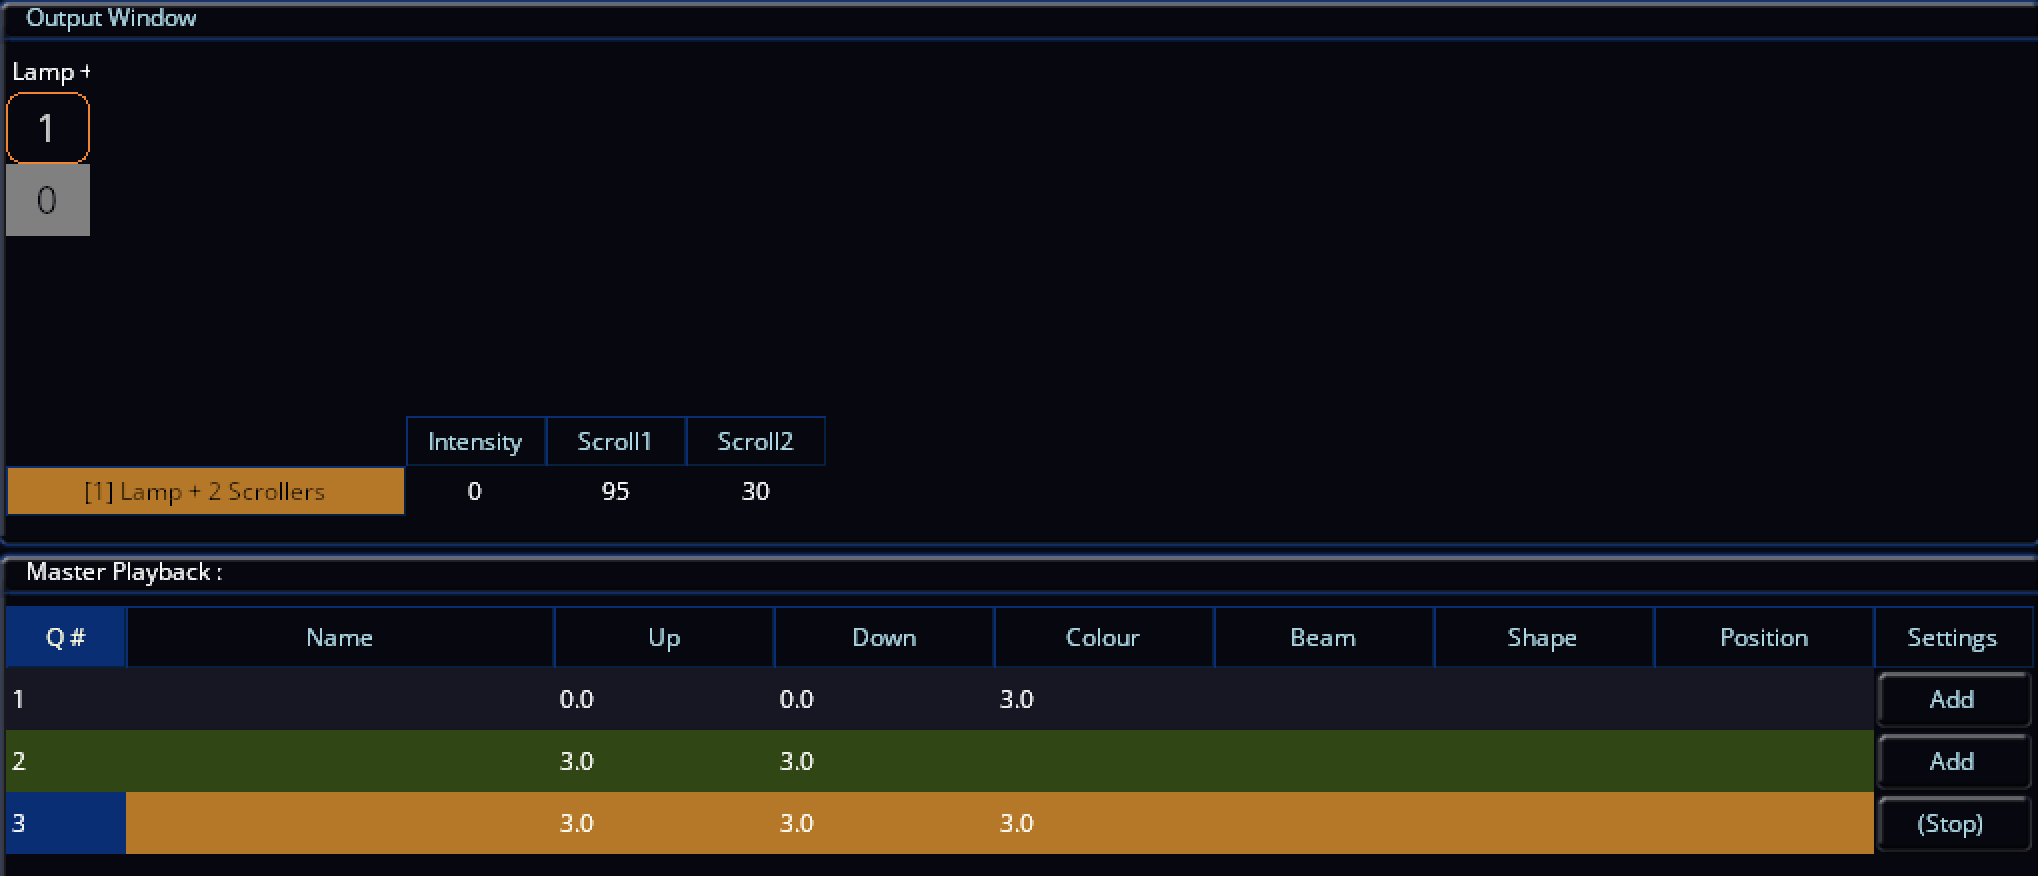
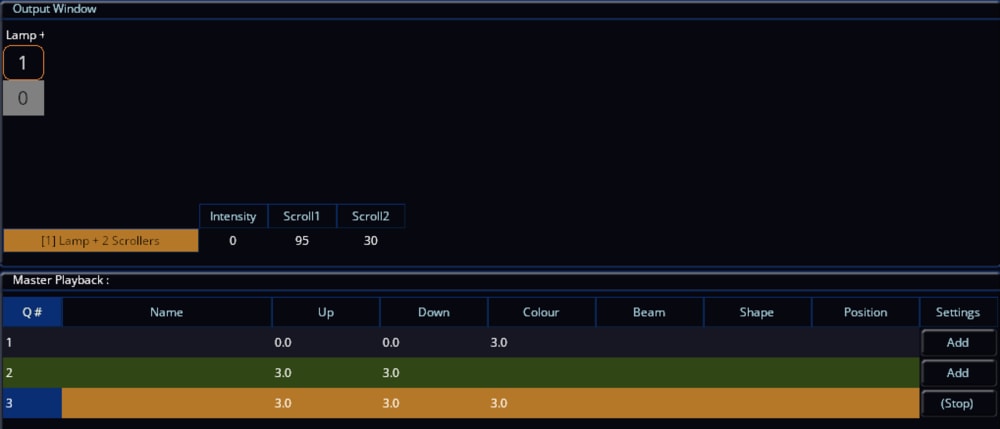
Forgive me if I've misunderstood the original post, but following this, here's a fixture file.. With this, we're using sub-fixtures instead of regular parameters in one single fixture like other fixtures would. This allows you to separate two parts of what we want to achieve here - to use this singular fixture as having the 'Lamp' (Intensity) defined as your actual dimming light (in your case - two linked to the same channel), and then configure the 'Scroll' part separately of the fixture to be on a different address, achieving your initial wish to 'link' the scrollers to the 'Intensity' of your incandescent fixture, where both the Intensity and two scrollers (together) can be as far apart in the DMX universe as you need, but the lamp must be the lower address (meaning the scroll can only be a DMX address after the lamp). Note that if you define the Scroll part of the fixture to be on e.g. DMX 57, that will be the first scroller. The second scroller will therefore be on DMX 58, with the Intensity being anywhere you wish (e.g. DMX 3 - completely away from the scrollers), again 'linking' the scrollers to the intensity. You will need to replace the Dimmer fixture you currently have patched in for your intensity with this one, but don't worry - the lamp intensity will work exactly the same, but giving you the additional scrollers. The scrollers will then actively 'listen' to the intensity and when it is at 0, the scrollers will use Move on Dark. We can see this in action with the grey background of fixture 1 on the second screenshot - the Scroll1 and Scroll2 values were both moving on dark at that time. And remember to always back up your show file before making critical changes like this. When patching this new fixture in after loading the .ift via SETUP > Load > IFT File, a 'Part' column will be added to the Fixture Schedule. This will indicate the Lamp and Scroll parts of the fixture as described above. See pictures and fixture file (.ift) below... Lamp + 2 Scrollers.ift

-
Is there an archive of Zero88 software versions?
Archie D replied to Simonkbike's topic in General Discussion
Hi Simon, Fantastic to hear it’s working for you. I expect the 9-134 is a locked colour as you say, and then 240-255 is to use colour..? I think the aim of it is to use 240-255 as a sort of ‘base’ intensity adjustment with a wiggle room of only a range of 15, with the colour values themselves allowing for fine intensity adjustments (0-255 on each of RGBW). Best of luck with your panto! Kind regards Archie -
Is there an archive of Zero88 software versions?
Archie D replied to Simonkbike's topic in General Discussion
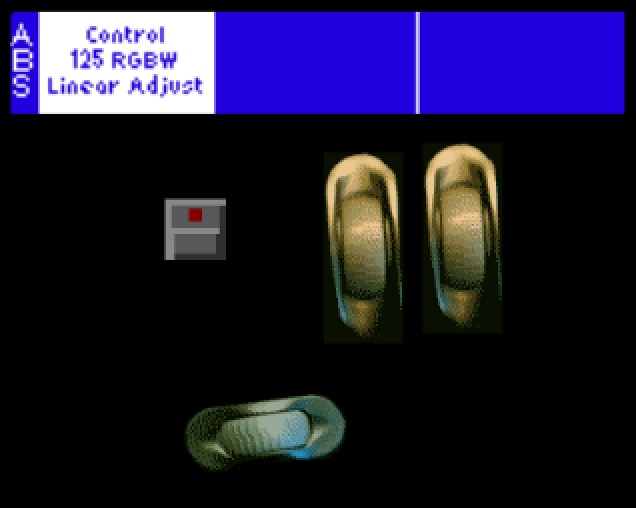
Hi Simon, thank you for sharing the DMX chart for your fixture. It appears that CH1 in the 9-134 range is the fixture's intensity control itself (I think), with 0-8 having the fixture in dark at zero intensity. Using a virtual intensity channel for this is a good idea (which you have done) and will scale the values accordingly. Out of curiosity, what manufacturer and fixture is this chart for? You're correct, you won't see how to set these in the ZerOS fixture creation tool, it appears to only be available on the fixture tools application. You'll find this within the 'Details' tab of the parameter you are editing, of which you can assign names to specific value ranges which will appear and change when controlling that parameter (on the Wheels LCD and external monitor in the Output Window). I've attached a picture below of what I've made for CH1 in the picture you have provided, along with the view of how it should look on the Wheels LCD and the external monitor in the Output Window. You'll notice that on the selected field named 'Shutter Closed' (DMX value 0-8), I have 'Dark' set to 'Yes' by ticking the 'Is Dark' box. This will now ensure those values work with Move on Dark on the desk, so when the fixture goes down into these values for zero brightness, ZerOS will 'know' it is at zero intensity and is safe to move parameters ready for another cue. You may not need this 'Is Dark' feature, as you're using virtual intensity, but I'm not sure. If you use Fixture Tools for this, and then decide later on to edit that fixture profile using the on-board ZerOS fixture editor, you might find it will break these added labels per value range, just something to be aware of. If there's anything else I can potentially help with, please feel free to ask.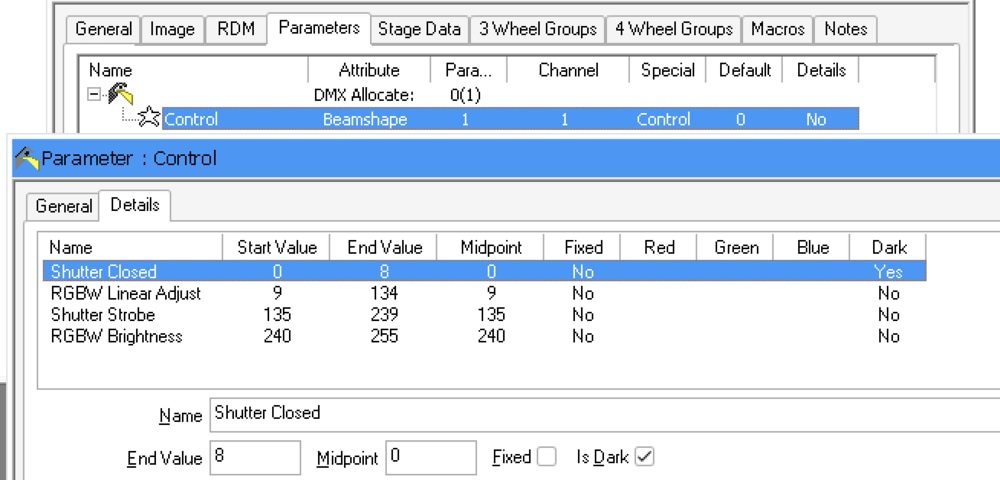

-
Is there an archive of Zero88 software versions?
Archie D replied to Simonkbike's topic in General Discussion
Hi Simon, The PhantomZerOS installer .exe is contained in the .zip file for each ZerOS download. To download the zip file, select a legacy version of ZerOS in the Legacy section, and unzip the zip which has been downloaded. You can then install that by running the PhantomZerOS executable file. https://www.vari-lite.com/global/products/zeros-software Since ZerOS 7.13, there's been a new way to create fixture files that allows compatibility for multi-cell (selecting and controlling individual 'zones' or LEDs of a fixture), and also allows for quick on-the-fly fixture creation without needing the legacy Fixture Tools application package. To access this, enter SETUP > Add Fixtures > Create new fixture > Next. This will allow you to define how many channels the fixture profile has using + and - buttons in the window, or clicking the '# of channels' button to input a number (means you can quickly get there without multiple clicks of + and -). You can then define what those channels are by clicking the designated buttons for each one. In the dropdown below (which should be open by default), you can input which manufacturer, the model name, the channel mode and whether it is an RDM-enabled fixture. Once you've inputted everything, tap 'OK'. The console will then prompt you of how many fixtures you want to be added to the patch (returning to the normal thing that would happen after pressing 'Next'). If you need to export this fixture (or any fixture) to a USB stick, you can click 'Edit & Export' bottom right next to 'Back' and 'Finish'. In 'Edit & Export', you can re-save it to the library after editing, save to USB or delete it. When exporting, the fixture profile will be in the .zfix format, which can be loaded into any other ZerOS console. .ift personality files are still compatible, so if you wish to use the legacy fixture tools package still, you can. I hope this helps, if you have any more questions feel free to ask. -
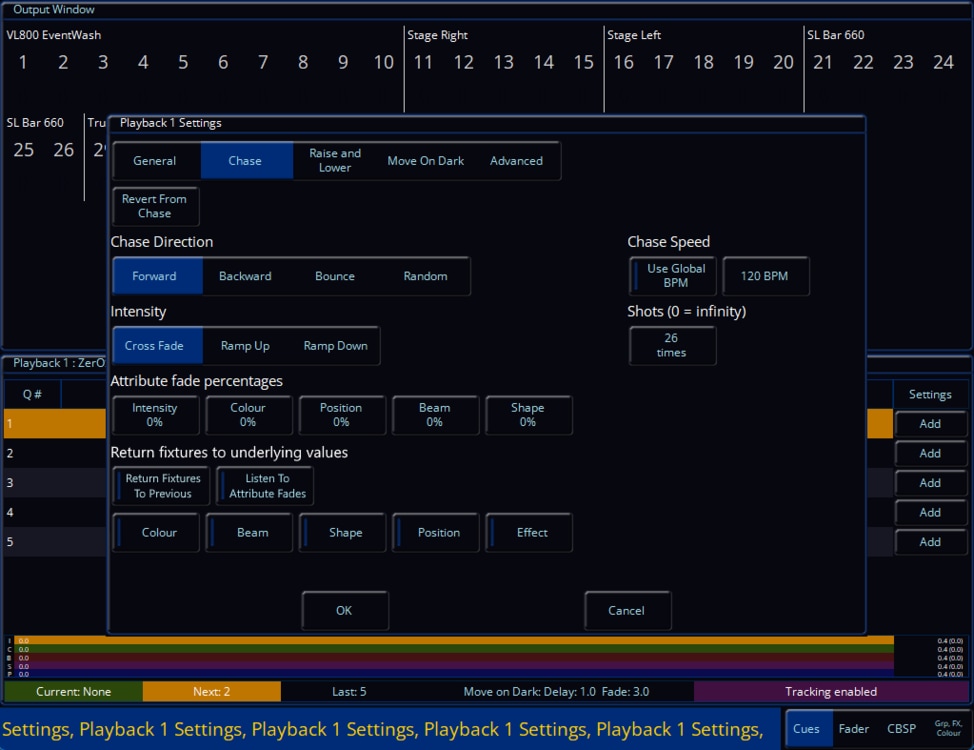
How about something like this? I've added two toggleable options at the bottom of the Playback Settings window in the 'Chase' tab (it also fills the blank space there) giving the ability to enable the return of fixtures to previous/underlying values during the chase running, with the extra option of 'Listen to attribute fades' for listening to the fade percentages above this added 'section'. With listening to attribute fades, as soon as it goes back to the previous/underlying values (explained below on how this would work*), it will use the fade percentages defined in the exact same way it would work fading step to step in the chase itself. It also gives the ability to enable or disable fading each separate parameter with the toggles below those two options, so you can return individual (instead of all parameters) parameters to their underlying values. As soon as you enable 'Listen to attribute fades' (making the selection indicator red), all parameters listed below will also go red. This will allow individual control of each one, or all. *The main principle of this new addition is that the console looks for fixtures hitting zero of any parameter in each step of the chase (this can be changed to be a selection in each cue of the cue settings instead perhaps, because values of zero are needed in some cases e.g. colour - but this would still work for intensity based ones), of which at that point they will return to any underlying data (in this case, the other playback, preventing the need to trigger and release multiple playbacks), a bit like how making a change in the programmer then double tapping the CLEAR key will return them to the previous values. I think this mitigates the situation we're currently in with using multiple playbacks painfully. Please let me know about any feedback you might have for this! Edit - I've just realised I forgot to include 'Intensity' in the toggleable section at the bottom (just imagine it's there for now!)