Archie D
-
Posts
105 -
Joined
-
Last visited
-
Days Won
13
Everything posted by Archie D
-
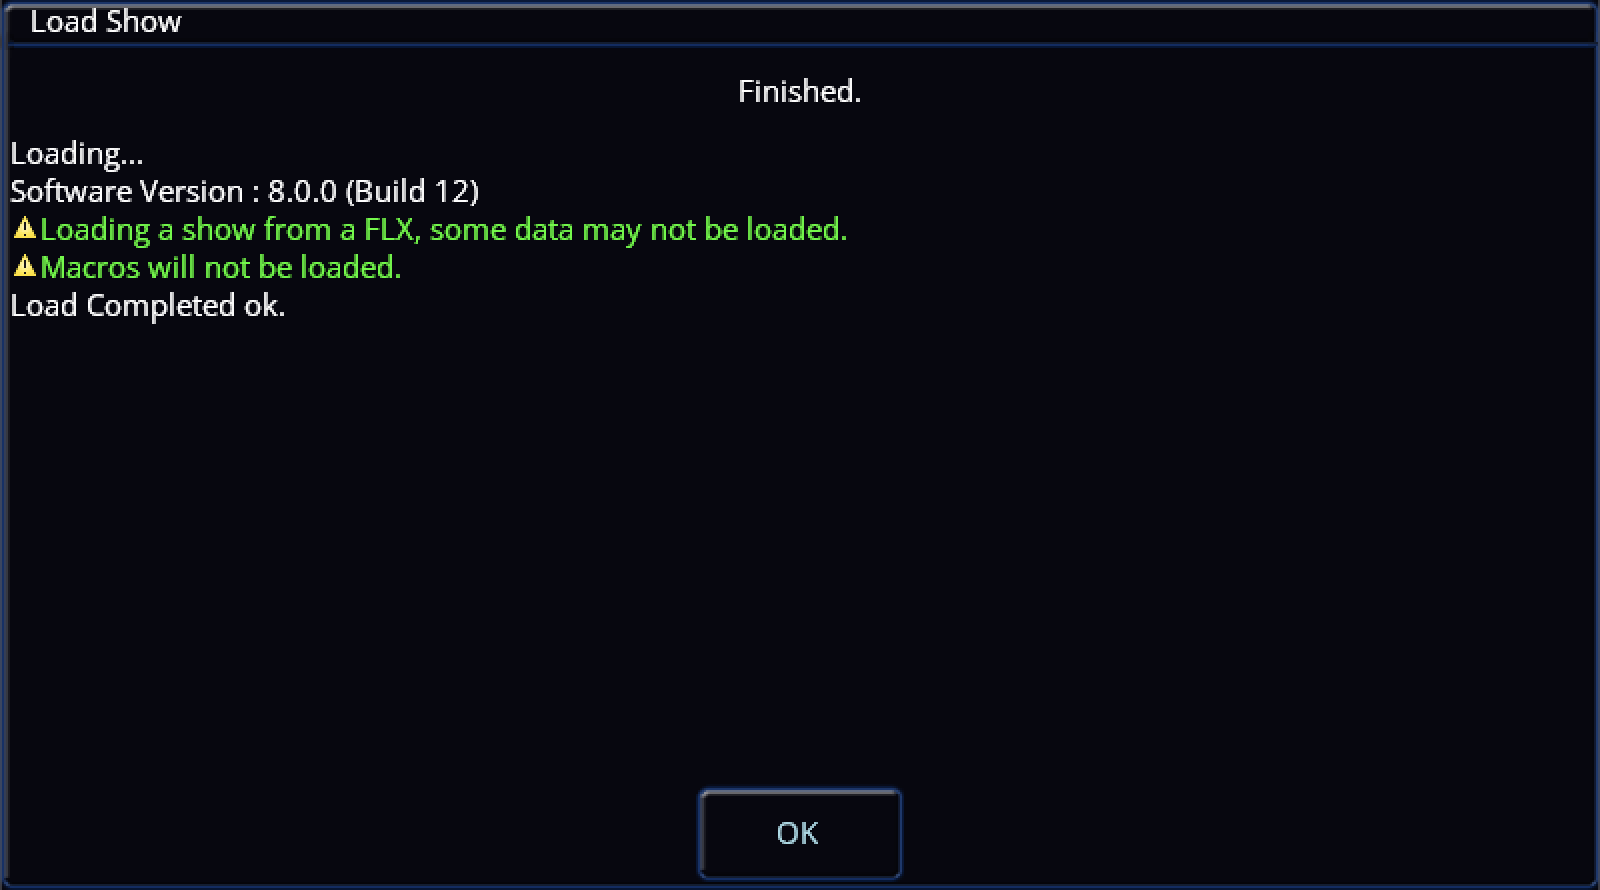
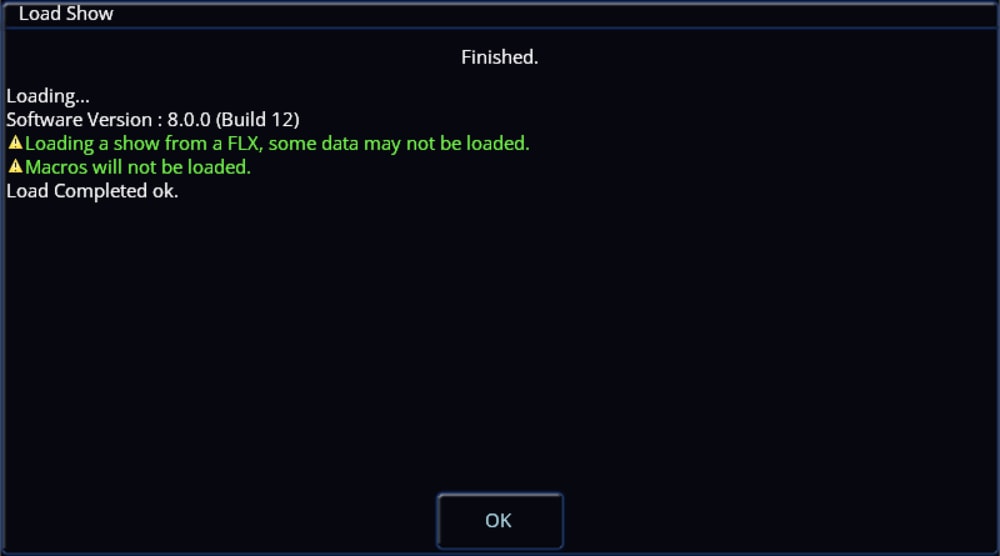
Just for clarification, when loading a show file containing User Macros into a FLX S console, they will be disregarded and not transferred over. Hope this helps. Archie
-
Just putting what I posted on the Zero 88 Users Group here in case anybody needs a solution to the same problem.
-
Hi Peter, I've just replied to your post on the Zero 88 Users Facebook Group. Give it a go and let me know how you get on. Archie
-
Fantastic to hear it is working. Please feel free to ask any more questions if you have any. Archie
-
Hi @CestM0i64, In ZerOS, Playback 0 is the master playback, so using OSC (e.g. /zeros/cue/go/0/20) will go to cue 20 in the Master Playback. Therefore, Playback 1 will be go/1/<cue number>, and so on. Hope this helps, feel free to ask any more questions you may have. Archie
-
Ever since acquiring my Frog 2, I noticed that with the Dockhouse (Capture) Demo Presentation show file for ZerOS (available from Zero 88 here), it is of course a .zos file. The change from .isf to .zos for show files was made in ZerOS 7.9.8, a version of which is after 7.8.2.39 (the last supported software version for Frog 2) meaning Frog 2 only loads show files saved with the .isf extension. This means my fellow Frog 2 users won't be able to use the Capture Demo File for learning or having a play/experiment, so I have "converted" the .zos show file to .isf in order to be compatible with Frog 2. I imagine the audience for this won't be too large anymore since I feel Frog 2 popularity has died down significantly, but I'm posting this as a public resource in case it is of use to anybody who still uses a Frog 2 or a console on a version of ZerOS before 7.9.8. When loading in the show file, you'll be told it was from a Frog 2 and that some data won't be loaded. There shouldn't be any reason that some data won't be loaded with the way I've done this, but if you are loading this file onto a Frog 2, UDF 1 (User Defined Fader) will have a stored state on it. If loading this onto a different console type without UDFs (e.g. Solution), this should be transferred onto playback/submaster 1 (theoretically). It is also worth noting that this .isf show file is only within the limitations of Frog 2 - meaning the other higher universes found on the .zos version won't be seen or usable (Universe 5 & 6). The attached show file loads with the newer ZerOS skin if on Frog 2 - other consoles have that skin by default regardless, to provide a familiar user interface appearance to the other consoles people may have used with capture in comparison to the light grey and green classic theme on Frog 2. I have tested the .isf file with the Zero 88 provided Dockhouse 2022 file designed for the .zos version and it does work correctly. Anyway.. here's the show file, hope it is of use. Z88 Capture Dockhouse v7-8-2-39.isf
-
- 2
-

-
Save solution files for use on Leapfrog48?
Archie D replied to Muller Light's topic in Solution & Solution XL
Thank you for this information, it definitely sounds like ZerOS Watchdog kicked in while loading the show file. It would have displayed a list of registers and then also a stack trace. Archie -
Save solution files for use on Leapfrog48?
Archie D replied to Muller Light's topic in Solution & Solution XL
Hi Paul, Saving the setup within the show file as well theoretically shouldn't cause any problems. If you can recall - when the console crashed, was it a black screen with a load of white text (ZerOS Watchdog kicking in) or did the console just completely freeze, preserving monitor output too? Let me know how you get on later with LF48TEST1.zos, it has a few things disabled/removed to see if anything in the show file itself is crashing the LF48. One of my theories for this was that because the Leapfrog 48/96 came with 2 DMX universes as standard, with an optional upgrade card while the Solution comes with 4 universes straight from the factory, that ZerOS was trying to index a universe from the Solution (3 & 4) that didn't exist on the Leapfrog when loading in the show file (if the optional upgrade card for 2 more outputs isn't present). Hence, U3 and U4 are disabled in that show file. However, it is just a theory and could be wrong. It's all about experimentation to see what works! I look forward to hearing from you, thank you. Archie -
Save solution files for use on Leapfrog48?
Archie D replied to Muller Light's topic in Solution & Solution XL
Hi Paul, Thank you for providing your show file. Please could you see if this file loads into your Leapfrog 48? If it doesn't and the console crashes, what does the console show on the external monitor? Please don't panic that your cues/playbacks are missing by the way for this file - I'm simply juggling things to see what does what. Thank you. LF48TEST1.zos -
Save solution files for use on Leapfrog48?
Archie D replied to Muller Light's topic in Solution & Solution XL
Hi Paul, Sounds good, if you’re still experiencing difficulties tomorrow, please could you upload your showfile here if that’s okay? I can then see if I can potentially find anything on PhantomZerOS and my Solution XL (though if it loads fine onto a Solution and not the Leapfrog 48, I might be lost) When the Leapfrog 48 crashed, was it a ZerOS Watchdog message that appeared? I’m curious as to what it said, or what the crash behaviour was like.. Thank you and have a good rest of your day. Archie -
Save solution files for use on Leapfrog48?
Archie D replied to Muller Light's topic in Solution & Solution XL
Hi @Muller Light, ZerOS showfiles are cross-compatible between ZerOS-based consoles, only with some data not being loaded (for example when you load a FLX showfile into a Solution, some data from the FLX won’t be loaded in). However, this won’t happen because Leapfrog 48 and Solution are identical, you’ll only receive a warning due to the different console types, but all data will be passed over. What software version are both of your consoles running? To see this, in the Output Window click ‘Other Windows’ (top left) -> System Information -> Software Version. What format is your showfile? Is it a .isf, or .zos? Many thanks, Archie -
Hi Simon, To adjust cue delay times on Solution, the best method is to use the MFKs (Multi Function Keys) instead of the encoder wheels. Navigate your cursor using the mouse or arrow keys to an 'Up' or 'Down' field, then tap ENTER to start editing the time. On the top right MFK, tap 'Delay'. It will now have the red LED lit, with the white background to show it is selected. Type in a time using the MFKs or an external keyboard, then hit ENTER again to submit this. For your instance editing the 'Down' field, the down delay has now been applied to your cue. You also have the option to do this at the same time when editing a regular up or down fade time for a cue for efficiency. When editing a fade time, simply switch between 'Delay' being selected or not, and when pressing ENTER to submit these changes, both changes for the regular fade time and the delay time will be applied in one go together. I hope this helps, feel free to ask any other questions you may have. Archie
-
Hi Simon, Good to hear it seems to have fixed itself. I've just popped in to leave a few comments. You may have accidentally knocked the intensity encoder wheel slightly when making changes, so when re-recording default values with RECORD -> HOME -> Default, the intensity information is also included in the defaults of the fixture. Were you using RECORD -> HOME -> Default to do this after changing the intensity to 0%? This next bit is unlikely, but did the 'Intensity' selection button have a red indicator instead of blue? If it was blue, that intensity information won't be recorded into the defaults, so when you CLEAR CLEAR, the fixture will still go back to the original intensity default value. An image is attached with 'Intensity' under 'Attributes' having a blue indicator. The reason I say this is unlikely is because when you make a change (intensity in this case), when tapping RECORD, the changed parameters (which are therefore tagged) will be automatically in red to show they are selected. Though with this being said, in the image you have provided while trying to change fixture 5's intensity back to 0, 'Intensity' has a red indicator... Correct - the yellow D in 'Sources' as opposed to 'Intensities' indicates the intensity is coming from a default value of that fixture. A red P in 'Sources' indicates a manual programmer adjustment or modification. All in all, it is sorted, but I just thought I'd provide little segments of extra information in case anybody reading this isn't sure. Have a great week Simon. Kind regards, Archie

-
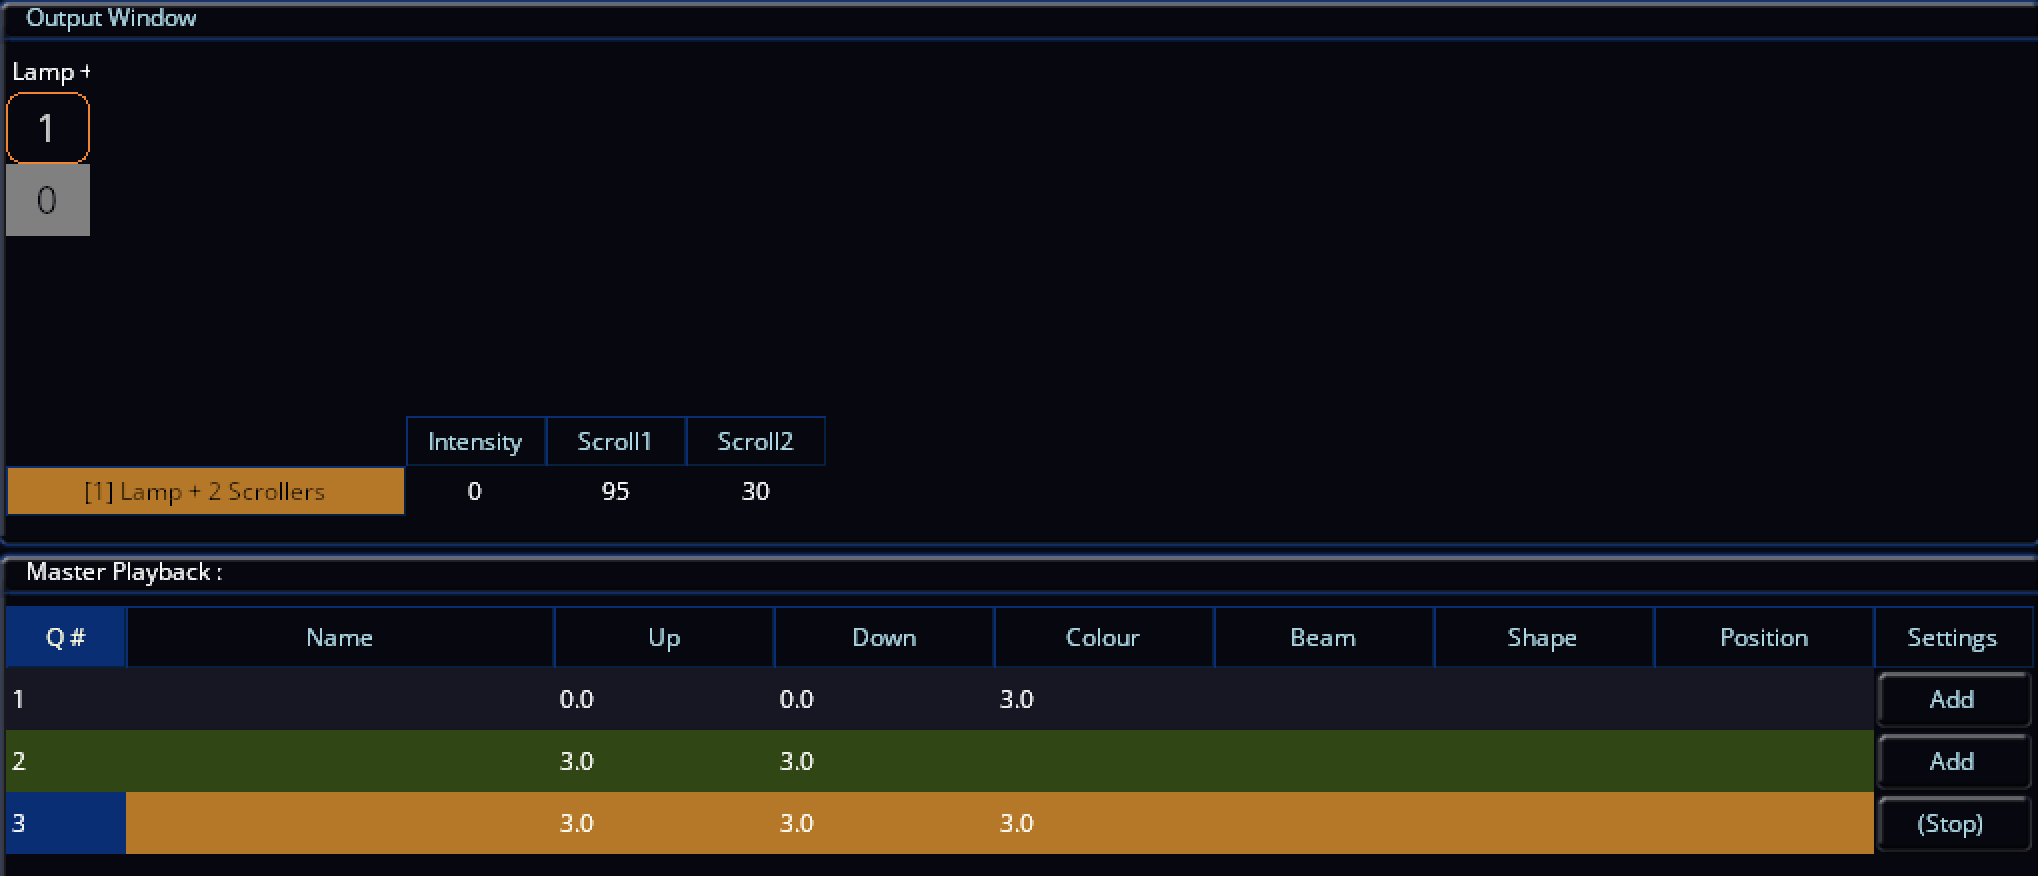
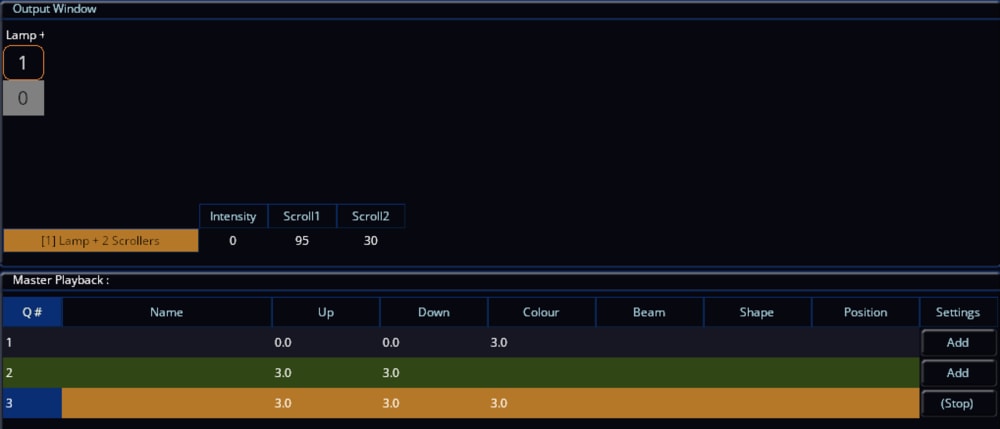
Forgive me if I've misunderstood the original post, but following this, here's a fixture file.. With this, we're using sub-fixtures instead of regular parameters in one single fixture like other fixtures would. This allows you to separate two parts of what we want to achieve here - to use this singular fixture as having the 'Lamp' (Intensity) defined as your actual dimming light (in your case - two linked to the same channel), and then configure the 'Scroll' part separately of the fixture to be on a different address, achieving your initial wish to 'link' the scrollers to the 'Intensity' of your incandescent fixture, where both the Intensity and two scrollers (together) can be as far apart in the DMX universe as you need, but the lamp must be the lower address (meaning the scroll can only be a DMX address after the lamp). Note that if you define the Scroll part of the fixture to be on e.g. DMX 57, that will be the first scroller. The second scroller will therefore be on DMX 58, with the Intensity being anywhere you wish (e.g. DMX 3 - completely away from the scrollers), again 'linking' the scrollers to the intensity. You will need to replace the Dimmer fixture you currently have patched in for your intensity with this one, but don't worry - the lamp intensity will work exactly the same, but giving you the additional scrollers. The scrollers will then actively 'listen' to the intensity and when it is at 0, the scrollers will use Move on Dark. We can see this in action with the grey background of fixture 1 on the second screenshot - the Scroll1 and Scroll2 values were both moving on dark at that time. And remember to always back up your show file before making critical changes like this. When patching this new fixture in after loading the .ift via SETUP > Load > IFT File, a 'Part' column will be added to the Fixture Schedule. This will indicate the Lamp and Scroll parts of the fixture as described above. See pictures and fixture file (.ift) below... Lamp + 2 Scrollers.ift

-
Is there an archive of Zero88 software versions?
Archie D replied to Simonkbike's topic in General Discussion
Hi Simon, Fantastic to hear it’s working for you. I expect the 9-134 is a locked colour as you say, and then 240-255 is to use colour..? I think the aim of it is to use 240-255 as a sort of ‘base’ intensity adjustment with a wiggle room of only a range of 15, with the colour values themselves allowing for fine intensity adjustments (0-255 on each of RGBW). Best of luck with your panto! Kind regards Archie -
Is there an archive of Zero88 software versions?
Archie D replied to Simonkbike's topic in General Discussion
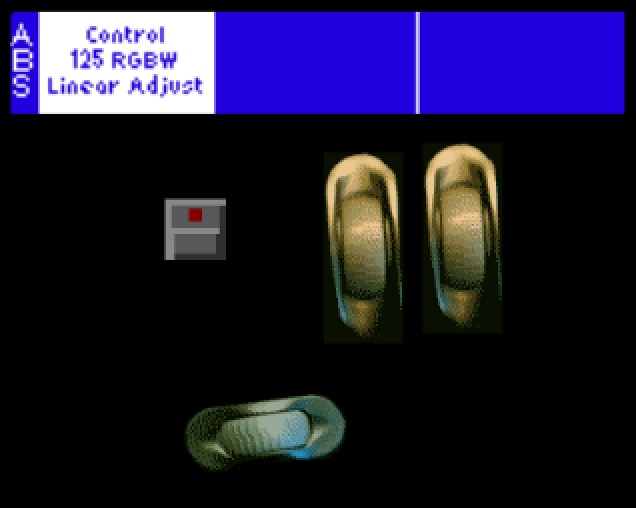
Hi Simon, thank you for sharing the DMX chart for your fixture. It appears that CH1 in the 9-134 range is the fixture's intensity control itself (I think), with 0-8 having the fixture in dark at zero intensity. Using a virtual intensity channel for this is a good idea (which you have done) and will scale the values accordingly. Out of curiosity, what manufacturer and fixture is this chart for? You're correct, you won't see how to set these in the ZerOS fixture creation tool, it appears to only be available on the fixture tools application. You'll find this within the 'Details' tab of the parameter you are editing, of which you can assign names to specific value ranges which will appear and change when controlling that parameter (on the Wheels LCD and external monitor in the Output Window). I've attached a picture below of what I've made for CH1 in the picture you have provided, along with the view of how it should look on the Wheels LCD and the external monitor in the Output Window. You'll notice that on the selected field named 'Shutter Closed' (DMX value 0-8), I have 'Dark' set to 'Yes' by ticking the 'Is Dark' box. This will now ensure those values work with Move on Dark on the desk, so when the fixture goes down into these values for zero brightness, ZerOS will 'know' it is at zero intensity and is safe to move parameters ready for another cue. You may not need this 'Is Dark' feature, as you're using virtual intensity, but I'm not sure. If you use Fixture Tools for this, and then decide later on to edit that fixture profile using the on-board ZerOS fixture editor, you might find it will break these added labels per value range, just something to be aware of. If there's anything else I can potentially help with, please feel free to ask.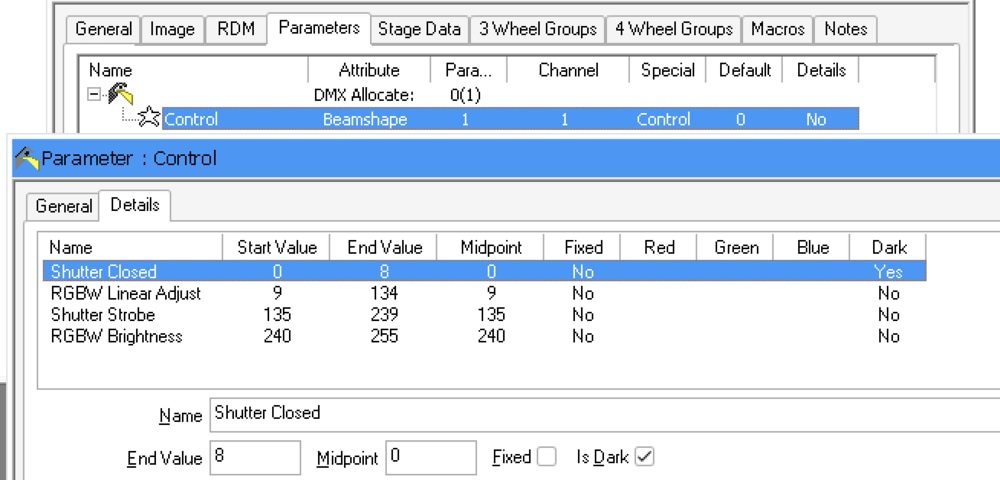

-
Is there an archive of Zero88 software versions?
Archie D replied to Simonkbike's topic in General Discussion
Hi Simon, The PhantomZerOS installer .exe is contained in the .zip file for each ZerOS download. To download the zip file, select a legacy version of ZerOS in the Legacy section, and unzip the zip which has been downloaded. You can then install that by running the PhantomZerOS executable file. https://www.vari-lite.com/global/products/zeros-software Since ZerOS 7.13, there's been a new way to create fixture files that allows compatibility for multi-cell (selecting and controlling individual 'zones' or LEDs of a fixture), and also allows for quick on-the-fly fixture creation without needing the legacy Fixture Tools application package. To access this, enter SETUP > Add Fixtures > Create new fixture > Next. This will allow you to define how many channels the fixture profile has using + and - buttons in the window, or clicking the '# of channels' button to input a number (means you can quickly get there without multiple clicks of + and -). You can then define what those channels are by clicking the designated buttons for each one. In the dropdown below (which should be open by default), you can input which manufacturer, the model name, the channel mode and whether it is an RDM-enabled fixture. Once you've inputted everything, tap 'OK'. The console will then prompt you of how many fixtures you want to be added to the patch (returning to the normal thing that would happen after pressing 'Next'). If you need to export this fixture (or any fixture) to a USB stick, you can click 'Edit & Export' bottom right next to 'Back' and 'Finish'. In 'Edit & Export', you can re-save it to the library after editing, save to USB or delete it. When exporting, the fixture profile will be in the .zfix format, which can be loaded into any other ZerOS console. .ift personality files are still compatible, so if you wish to use the legacy fixture tools package still, you can. I hope this helps, if you have any more questions feel free to ask. -
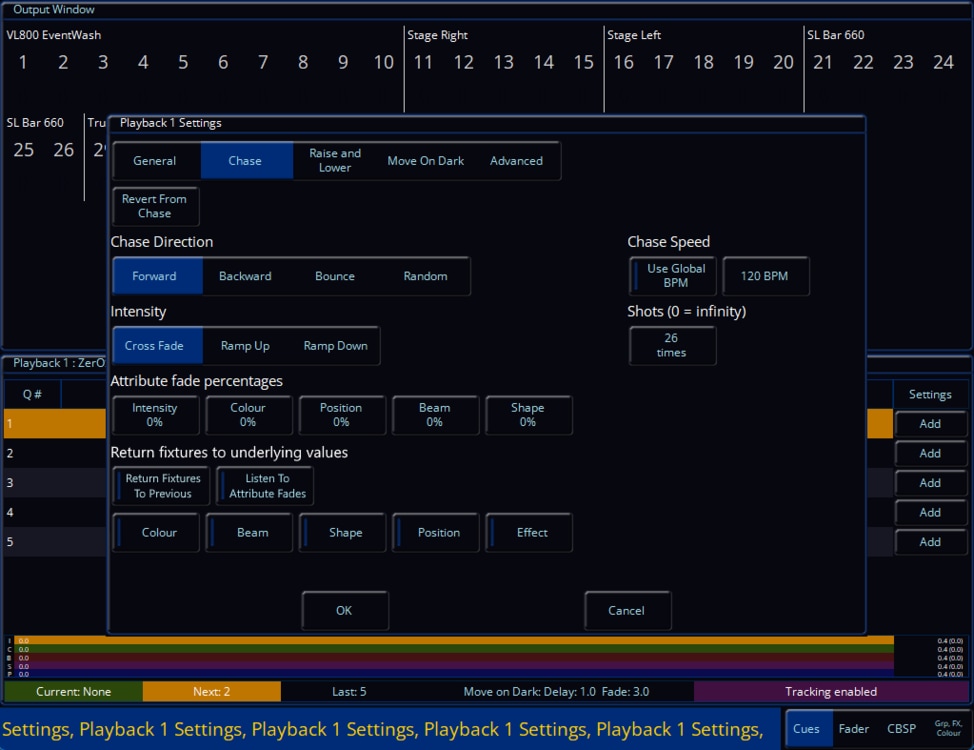
How about something like this? I've added two toggleable options at the bottom of the Playback Settings window in the 'Chase' tab (it also fills the blank space there) giving the ability to enable the return of fixtures to previous/underlying values during the chase running, with the extra option of 'Listen to attribute fades' for listening to the fade percentages above this added 'section'. With listening to attribute fades, as soon as it goes back to the previous/underlying values (explained below on how this would work*), it will use the fade percentages defined in the exact same way it would work fading step to step in the chase itself. It also gives the ability to enable or disable fading each separate parameter with the toggles below those two options, so you can return individual (instead of all parameters) parameters to their underlying values. As soon as you enable 'Listen to attribute fades' (making the selection indicator red), all parameters listed below will also go red. This will allow individual control of each one, or all. *The main principle of this new addition is that the console looks for fixtures hitting zero of any parameter in each step of the chase (this can be changed to be a selection in each cue of the cue settings instead perhaps, because values of zero are needed in some cases e.g. colour - but this would still work for intensity based ones), of which at that point they will return to any underlying data (in this case, the other playback, preventing the need to trigger and release multiple playbacks), a bit like how making a change in the programmer then double tapping the CLEAR key will return them to the previous values. I think this mitigates the situation we're currently in with using multiple playbacks painfully. Please let me know about any feedback you might have for this! Edit - I've just realised I forgot to include 'Intensity' in the toggleable section at the bottom (just imagine it's there for now!)
-
Good morning @Sol, Welcome to the Zero 88 Forum! @Davidmk and @kgallen have done an excellent explanation of how to go about solving this with a 'master' playback triggering and releasing other singular playbacks. I would have done it the same way. I'll admit, this is something that should be able to be done easier, but this is unfortunately currently the only way to do so. I've written some guidance below, expanding on the discussed elements in this post, to help you along with this. (Apologies for the colossal message, I have tried my best to cut it down). In the following steps, you'll be programming individual playbacks with one lighting state each for each 'step' of your chaser. As Kevin and David have mentioned, we can then trigger and release these individual playbacks with a master playback (not the regular type of Master Playback with the main GO button though, to avoid confusion) that just has control over these individual playbacks. It's worth noting that the 'master' playback you'll program will be a chase, with the individual playbacks (the 'steps' of the chase) will be one state on each playback. E.g. Playback 10 has fixture 1 and 5 at full white, then Playback 11 has fixture 2 and 4 at full white, with 1 and 5 at zero, then finally Playback 12 has fixture 3 at full white, with 1, 5, 2 and 4 at zero. This creates the singular steps for an effect that will chase in towards the middle. By programming these individual steps onto separate playbacks (the last few playbacks available on your desk are recommended to keep them out of the way), it allows us to individually trigger and release them. When releasing a playback, ZerOS completely wipes it out from the outputs, returning to the underlying data for that fixture (if any at all), allowing fixtures to switch back to your original rainbow gradient. For example, if I have Playback 1 as fixture 1 thru 5 at full white, whereas in Playback 2 fixture 3 is at red - I bring up Playback 1 (all white), then I bring up playback 2 (fix. 3 at red) while keeping 1 at the same place. Fixture 3 will turn red. If I bring down Playback 2 (fix. 3 at red) to zero, fixture 3 will return to the original data it has in Playback 1 (white) as Playback 1 is still raised. Steps for creating each individual playback (acting as each step for the overall chase) Step 1: Bring those fixtures up for the first / next step of your chaser you want to program. Step 2: Put them in the colour 'White' so their colour is tagged. This will differentiate the colour from the underlying rainbow playback. Step 3: Tap 'Record' -> Tap an empty playback's flash button. (I recommend the last few playbacks, and ensure to leave room to place them in order so you know which one does what) e.g. 3 steps I would have Playback 46, 47, 48 with 46 being step 1 and 48 being step 3 (last step). After you've programmed each individual playback (e.g. each step) Step 1: Think about where you want to put your 'master' playback that will start your custom chaser. Pick somewhere which has an empty playback to the right of it (explained later*) Step 2: Ensure nothing is being output from the desk again. Tap 'Record' -> Tap that playback's flash button of where you want the 'master' playback to be. Then do the same for the empty playback to the right. This will record an empty cue on each playback. *The way this will work is the left one of the two playbacks will be the playback to start the chaser, and the right of the two will be the flash button to stop / release it (the whole chaser). Step 3 (repeat as many times as needed): Record an empty cue for each individual playback ('step') you have programmed onto the 'master' playback (left of the two). On the second cue recorded, the desk will show a prompt. Tap 'Create Chase'. The second cue has now been recorded, with the playback converted to a chase. This prompt will not appear for future cues/steps recorded to that playback, as it will just add another step to the existing chase. Step 4: Go to the first cue in this playback (VIEW + Playback Flash Button to view these cues) and tap 'Add' in the 'Settings' column for that cue. Step 5: As David mentions, use Macros -> Trigger Cue Stacks (tap 'Add' next to it) -> Select your individual playback for the first step. Tap OK. Tap OK again. Step 6: For cue 2, you should tap 'Add' in the 'Settings' column again, Macros -> Trigger your second individual playback for the second step, but under 'Release Cue Stacks', put in the previous step (for this - the first individual playback). That's the base of it done for the first two cues. You'll now want to repeat that for each individual playback (acting as each step) you have programmed, ensuring that for cues past the first trigger, you release the previous, and trigger the next. Cue 1 should have the first trigger, and releasing the last playback so when the chase repeats, no steps overlay each other. In the single cue in the playback to the right (the one we will use to stop the chaser all-together that I talked about earlier) - do VIEW + Playback Flash Button -> 'Add' in 'Settings' column -> Macros -> Release Cue Stacks -> Add in all of your individual playbacks. This will release all playbacks when you hit the flash button, stopping them. You can also trigger both of these playbacks in your main cue stack, so you don't have to worry about moving the faders. Note that if your 'master' playback for this chaser effect is still raised or active, then it will just re-trigger these individual playbacks, so when stopping using the playback to the right, ensure the 'master' playback is down. You may notice something odd with the fade timings for each step. To fix this, enter each playback's view like you've done previously (using VIEW + Playback Flash Button) and edit the fade times in the columns to whatever you wish. The console will listen to these fade times when triggering and releasing each individual playback. To set up your 'master' playback for a Tap Tempo, hold SETUP and tap your 'master' playback's flash button -> CHASE tab -> Use Global BPM (tap to get it with a red line to indicate it is selected). Then define an empty playback as a Global Tap Tempo by holding SETUP again and tapping a flash button of an empty playback -> Fader Function -> Global Tap Tempo -> OK. Again, I apologise for the very very lengthy message, but I hope this is relatively okay to understand, please do let us know if you need more help as this is quite painful to do, and many thanks again to Kevin and David for the initial replies! Archie
-
It would be great, but (I think) with the current way that ZerOS draws the 'Panel' desktop/window, it's unfortunately at a fixed size so therefore doesn't scale and make more space in that particular window as you resize the window (I'm using the desktop app in the image below, not the iPad app, so I'm able to rescale the window). Things are quite close together to try and ensure that they are big enough without having to make it all smaller to have more space between each of the buttons. Because there isn't much space, it'd be difficult to add labels as they are on the physical front panel in any free space for that window. The labels would be shown in one bitmap which covers the entire digital front panel, which is the way it's done in Phantom for the Front Panel view, but this 'Panel' desktop is actually inside ZerOS itself and not a separate part of the windows emulator. As a side note - I think this 'Panel' desktop is using the same window that's used for the upper part of Test Mode, it certainly looks like it... Anyway, I hope the Monitor x Remote solution worked out okay, if you have any other questions feel free to ask. Archie
-
Hi Simon, No worries, please let me know how you get on with this. In addition to my comment - if you find the Panels window buttons on ZerOS Monitor to be too small, try using the ‘Zoom’ accessibility feature on iPad. Archie
-
Hi @Simonkbike, Are you using the 'Panel' desktop view on Solution (in the ZerOS Monitor app) to attempt to hold the 'Memories' key and tap a playback's flash button? This unfortunately won't work as when you press the desired playback's flash button in the Monitor app, it will move your selected coordinates being relayed back to the console to the flash button, away from the 'Memories' key you were holding down (I think). You'll notice this, by observing that as soon as pressing the flash button on a playback while holding 'Memories', or even just tapping a blank space, the coordinates selection will move there and the 'Memories' key will then be visibly un-held if you look carefully. But then, if you move your finger a slight amount while still on the 'Memories' key, it will re-hold that button as the coordinates being relayed back to ZerOS will be moved back there due to a new touch update. As a solution to this problem: I strongly suggest using an iPhone, Android Phone or another iPad/Android tablet to run the ZerOS Remote app alongside the ZerOS Monitor app on the other device. This will allow you, in ZerOS Remote to navigate to the 'Playbacks' page using the dropdown at the bottom. The numbers you see along the bottom are the flash buttons for the designated playbacks along with their faders, and you can page through these using the 'Down' and 'Up' buttons at the top left, or jump straight to the master GO button with the 'Master' button. To change your currently viewed playback in the Memories window, hold the 'Memories' key on ZerOS Monitor in the 'Panel' window, and tap the playback's flash button on ZerOS Remote. Then, navigate back to Desktop 1 in ZerOS Monitor (or whichever desktop your memories window is kept on), and you'll see that you are now viewing the playback you've just selected using both apps. Even though this isn't a 'perfect' solution, it's unfortunately the best that I can offer. I hope this helps. Kind regards, Archie
-
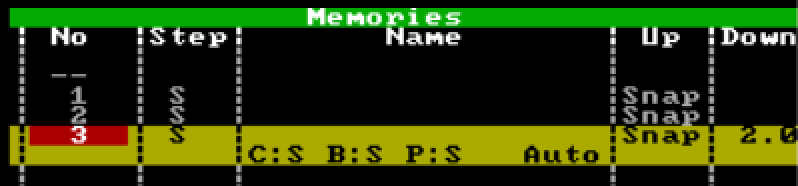
Hi @barefootcoder, I'm assuming you're working on a Jester 24/48, or a 12/24? Unfortunately, this isn't possible on those consoles due to the trigger functionality not being present. You'll simply have to press the GO button twice quickly. However, the answer is different if you are on a console that's on the ML side of things (Jester ML, ML24, ML48). If you are on a Jester ML console, you can do the following: 1. Go to the cue that you'd like to then program addition cues to snap down and fade down. 2. Bring the fixture you'd like to snap down to an intensity of 0. 3. Ensure 'Down' is 'Snap'. Then hit Program to store that cue, after selecting which memory to record to. 4. Now bring the other fixtures down to an intensity of 0. 5. Define a 'Down' fade time. 6. Use the 'Special' tab on the front panel to tap 'Trigger'. This will change it to 'Auto', which will be an instant follow-on from the previous cue. You can then hit program again. In Run mode, after hitting the GO button on the snap-down cue, the fade-all down cue will automatically follow. An example of this is what I've created below, where cue 1 is the state where all those fixtures are up, cue 2 is bringing a single fixture down in a snap, and cue 3 is an auto-follow of a fade of 2 seconds bringing everything else down: I hope this helps.
-
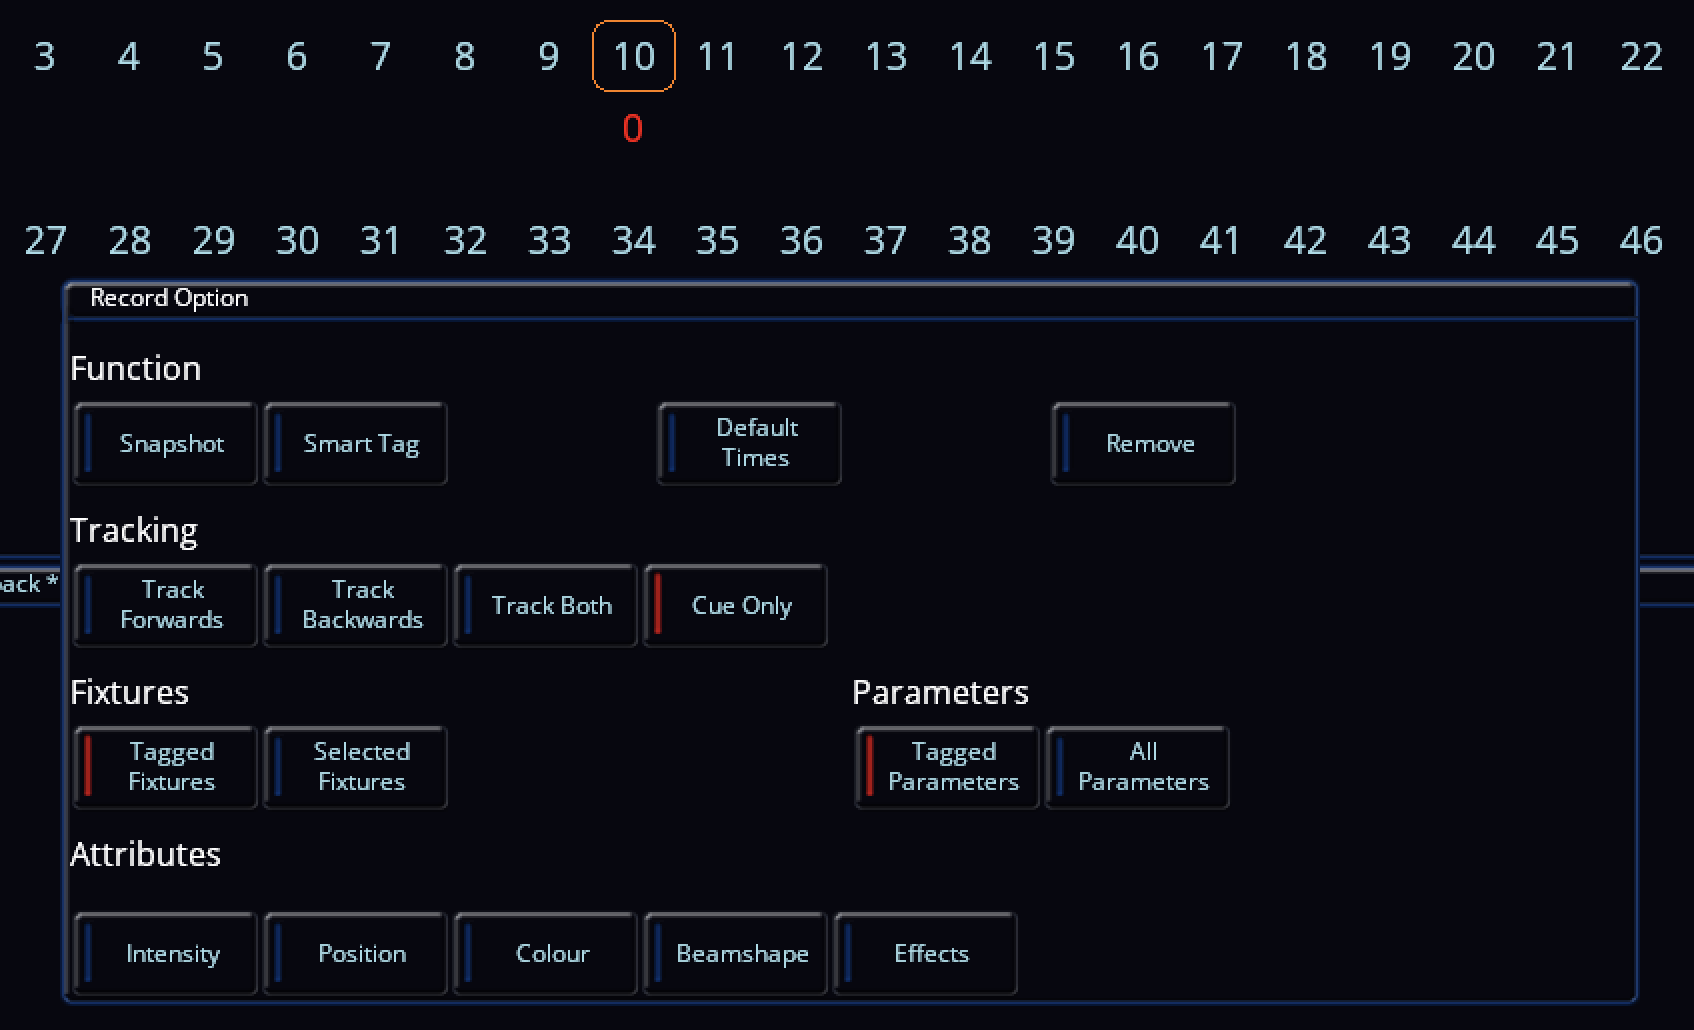
Hi @Alexandre, apologies for the late reply but I thought it was worth sharing this. Thank you for providing your show file. You're correct, the crash behaviour is related to Move on Dark being used in Playback 7. Upon further investigation of your show file, cue 3 in Playback 7 contains the 'Smooth' effect (E5 to be precise) applied to fixtures 2-9 and 49-54. After messing around with Move on Dark and only enabling specific attributes (position, effect, etc.), it appears that Move on Dark is looking forward in the cue stack (from cue 1 & 2) and is attempting to apply an intensity effect (Smooth) to fixtures that are at an intensity of 0 in that cue (essentially - those fixtures have no intensity values to modify by the effect / have had no intensity instructions as their intensities are not set in that cue and the previous ones - tracking is enabled). Note that 'Smooth' is an intensity based effect, which is likely the reason for the crash behaviour from what I can see. Instead of disabling Move on Dark generally for the whole playback, in ZerOS we have the option to disable certain parts of it, ensuring you don't lose out on any advantages of using Move on Dark e.g. with colour and position in sacrifice of effects to prevent crashing. To do this, you'll need to turn off the effect attribute for Move on Dark for the specific cue(s) that are causing you problems with Move on Dark so the console ignores any effects that may cause issues for that cue specifically. You could alternatively go the simple route - disabling effects in Move on Dark for the whole playback instead of just individual cues, but that will result in (for example) position based effects not being taken into account by Move on Dark, meaning effects such as 'Circle' won't be applied in dark - you will see them apply from 0 effect size to their defined effect size for that cue over the defined fade time as the fixture's intensity is brought up. You can, however, resolve this*. Disabling Move on Dark for effects only on specific cues: In the 'Settings' column in the cue stack, tap 'Add' on the cue you wish to disable effects with Move on Dark Tap 'Don't Move Effect' so it has a red indicator as opposed to a blue one (red is 'activated/selected', blue is not) Tap 'OK' Effects with Move on Dark has now been disabled for just that cue. When launching into this cue, effects will now be applied on the press of GO into that cue. You can do this for every cue that is causing a problem. Disabling Move on Dark for effects only on the entire playback: Hold the 'Setup' key on your console's front panel and tap your playback's flash button On the internal touchscreen (or monitor if using a FLX S48), tap 'Move on Dark' Tap 'Don't Move Effect' so it has a red indicator as opposed to a blue one *By enabling 'Don't Move Effect' for the whole playback in the playback's settings, inside each specific cue's settings referred in my first set of bulletpoints, that option will now have changed to 'Move Effect' (only for cues within that playback). This allows you to tell the console to look ahead in the cue stack and move the effect-based things for a specific cue anyway, ignoring the playback's general settings for Move on Dark that all effect movements are disabled. An example of this is shown in the image below in the far left column of options: I hope this helps, and I hope your FLX S continues to serve you well. Kind regards Archie

-
The ability to change views within the Output Window between 20 or 24 fixtures is possible with channel width located in 'Window Setup', but only for Solution / XL, Leapfrog 48/96, Orb, OrbXF and SCD Server Pro. This button is on the top bar of the Output Window, but unfortunately (as far as I can see), it is not available for FLX, FLX S or ZerOS Server. In response to your original question, you may be thinking of the 'Hide Unpatched' option within this popup window that will stop any unpatched fixtures being shown in the Output Window perhaps? See below: