Leaderboard


Popular Content
Showing content with the highest reputation since 07/28/2025 in all areas
-
My post on the topic of OSC use with the Zero88 FLX S24 may be of interest. All free software and might give you a start in understanding the process.3 points
-
Not sure really! I was running two switches, three Art-Net Nodes, one Wi-Fi AP, one Stream Deck, and a local laptop networked in for running ZerOS Monitor. Vari-Lite email support could only offer the suggestion that it would have been due to an unstable network. There could be some mileage in that as my laptop did occasionally drop connection to ZerOS Monitor. Anyway, its all over and done with now, I never ran them in tracking, however was ready to rapidly connect in the backup ethernet cable if my primary desk crashed during a show, which it didn't (hooray!) Pic for prosperity - stuck at the back of the box behind the venue desks - main sound FOH, running audio feeds into venue mixer
 2 points
 -
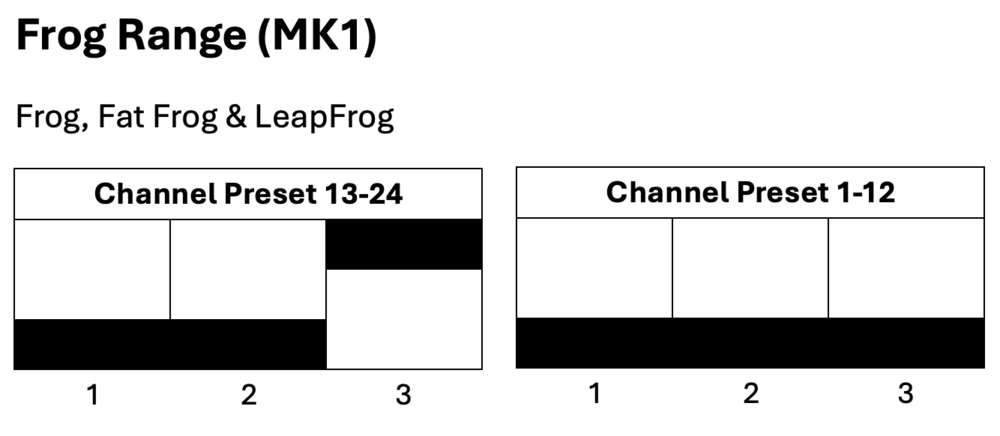
Ever since acquiring my Frog 2, I noticed that with the Dockhouse (Capture) Demo Presentation show file for ZerOS (available from Zero 88 here), it is of course a .zos file. The change from .isf to .zos for show files was made in ZerOS 7.9.8, a version of which is after 7.8.2.39 (the last supported software version for Frog 2) meaning Frog 2 only loads show files saved with the .isf extension. This means my fellow Frog 2 users won't be able to use the Capture Demo File for learning or having a play/experiment, so I have "converted" the .zos show file to .isf in order to be compatible with Frog 2. I imagine the audience for this won't be too large anymore since I feel Frog 2 popularity has died down significantly, but I'm posting this as a public resource in case it is of use to anybody who still uses a Frog 2 or a console on a version of ZerOS before 7.9.8. When loading in the show file, you'll be told it was from a Frog 2 and that some data won't be loaded. There shouldn't be any reason that some data won't be loaded with the way I've done this, but if you are loading this file onto a Frog 2, UDF 1 (User Defined Fader) will have a stored state on it. If loading this onto a different console type without UDFs (e.g. Solution), this should be transferred onto playback/submaster 1 (theoretically). It is also worth noting that this .isf show file is only within the limitations of Frog 2 - meaning the other higher universes found on the .zos version won't be seen or usable (Universe 5 & 6). The attached show file loads with the newer ZerOS skin if on Frog 2 - other consoles have that skin by default regardless, to provide a familiar user interface appearance to the other consoles people may have used with capture in comparison to the light grey and green classic theme on Frog 2. I have tested the .isf file with the Zero 88 provided Dockhouse 2022 file designed for the .zos version and it does work correctly. Anyway.. here's the show file, hope it is of use. Z88 Capture Dockhouse v7-8-2-39.isf2 points
-
Good morning @Sol, Welcome to the Zero 88 Forum! @Davidmk and @kgallen have done an excellent explanation of how to go about solving this with a 'master' playback triggering and releasing other singular playbacks. I would have done it the same way. I'll admit, this is something that should be able to be done easier, but this is unfortunately currently the only way to do so. I've written some guidance below, expanding on the discussed elements in this post, to help you along with this. (Apologies for the colossal message, I have tried my best to cut it down). In the following steps, you'll be programming individual playbacks with one lighting state each for each 'step' of your chaser. As Kevin and David have mentioned, we can then trigger and release these individual playbacks with a master playback (not the regular type of Master Playback with the main GO button though, to avoid confusion) that just has control over these individual playbacks. It's worth noting that the 'master' playback you'll program will be a chase, with the individual playbacks (the 'steps' of the chase) will be one state on each playback. E.g. Playback 10 has fixture 1 and 5 at full white, then Playback 11 has fixture 2 and 4 at full white, with 1 and 5 at zero, then finally Playback 12 has fixture 3 at full white, with 1, 5, 2 and 4 at zero. This creates the singular steps for an effect that will chase in towards the middle. By programming these individual steps onto separate playbacks (the last few playbacks available on your desk are recommended to keep them out of the way), it allows us to individually trigger and release them. When releasing a playback, ZerOS completely wipes it out from the outputs, returning to the underlying data for that fixture (if any at all), allowing fixtures to switch back to your original rainbow gradient. For example, if I have Playback 1 as fixture 1 thru 5 at full white, whereas in Playback 2 fixture 3 is at red - I bring up Playback 1 (all white), then I bring up playback 2 (fix. 3 at red) while keeping 1 at the same place. Fixture 3 will turn red. If I bring down Playback 2 (fix. 3 at red) to zero, fixture 3 will return to the original data it has in Playback 1 (white) as Playback 1 is still raised. Steps for creating each individual playback (acting as each step for the overall chase) Step 1: Bring those fixtures up for the first / next step of your chaser you want to program. Step 2: Put them in the colour 'White' so their colour is tagged. This will differentiate the colour from the underlying rainbow playback. Step 3: Tap 'Record' -> Tap an empty playback's flash button. (I recommend the last few playbacks, and ensure to leave room to place them in order so you know which one does what) e.g. 3 steps I would have Playback 46, 47, 48 with 46 being step 1 and 48 being step 3 (last step). After you've programmed each individual playback (e.g. each step) Step 1: Think about where you want to put your 'master' playback that will start your custom chaser. Pick somewhere which has an empty playback to the right of it (explained later*) Step 2: Ensure nothing is being output from the desk again. Tap 'Record' -> Tap that playback's flash button of where you want the 'master' playback to be. Then do the same for the empty playback to the right. This will record an empty cue on each playback. *The way this will work is the left one of the two playbacks will be the playback to start the chaser, and the right of the two will be the flash button to stop / release it (the whole chaser). Step 3 (repeat as many times as needed): Record an empty cue for each individual playback ('step') you have programmed onto the 'master' playback (left of the two). On the second cue recorded, the desk will show a prompt. Tap 'Create Chase'. The second cue has now been recorded, with the playback converted to a chase. This prompt will not appear for future cues/steps recorded to that playback, as it will just add another step to the existing chase. Step 4: Go to the first cue in this playback (VIEW + Playback Flash Button to view these cues) and tap 'Add' in the 'Settings' column for that cue. Step 5: As David mentions, use Macros -> Trigger Cue Stacks (tap 'Add' next to it) -> Select your individual playback for the first step. Tap OK. Tap OK again. Step 6: For cue 2, you should tap 'Add' in the 'Settings' column again, Macros -> Trigger your second individual playback for the second step, but under 'Release Cue Stacks', put in the previous step (for this - the first individual playback). That's the base of it done for the first two cues. You'll now want to repeat that for each individual playback (acting as each step) you have programmed, ensuring that for cues past the first trigger, you release the previous, and trigger the next. Cue 1 should have the first trigger, and releasing the last playback so when the chase repeats, no steps overlay each other. In the single cue in the playback to the right (the one we will use to stop the chaser all-together that I talked about earlier) - do VIEW + Playback Flash Button -> 'Add' in 'Settings' column -> Macros -> Release Cue Stacks -> Add in all of your individual playbacks. This will release all playbacks when you hit the flash button, stopping them. You can also trigger both of these playbacks in your main cue stack, so you don't have to worry about moving the faders. Note that if your 'master' playback for this chaser effect is still raised or active, then it will just re-trigger these individual playbacks, so when stopping using the playback to the right, ensure the 'master' playback is down. You may notice something odd with the fade timings for each step. To fix this, enter each playback's view like you've done previously (using VIEW + Playback Flash Button) and edit the fade times in the columns to whatever you wish. The console will listen to these fade times when triggering and releasing each individual playback. To set up your 'master' playback for a Tap Tempo, hold SETUP and tap your 'master' playback's flash button -> CHASE tab -> Use Global BPM (tap to get it with a red line to indicate it is selected). Then define an empty playback as a Global Tap Tempo by holding SETUP again and tapping a flash button of an empty playback -> Fader Function -> Global Tap Tempo -> OK. Again, I apologise for the very very lengthy message, but I hope this is relatively okay to understand, please do let us know if you need more help as this is quite painful to do, and many thanks again to Kevin and David for the initial replies! Archie2 points
-
From the manual... Cue only means that tracking options will not be available within the Record and Update windows. Cues are programmed with a full capture of the stage output to ensure what you see on stage is exactly what is programmed, and exactly what will be played back when you replay the cue. I suspect this is the reason why you are saving the whole stage output. Try it with cue only off - this should get you the record options, selected fixtures might be useful.2 points
-
Hi Scottydog75, Apologies for the delay in response. The software team are in the process of finishing the next beta build for ZerOS. This should be released for testing on the forum within the next couple of weeks. Kind Regards2 points
-
Hello Oliver_74 You can use the Add as additional address function found in the Edit DMX Address window to pair your five fixtures. When you select the DMX address of the first fixture you want to pair, the curser will flash in the DMX address window which will be blank. Type in the address of the second fixture in the pair, select Add as additional address, then Enter. The Fixture schedule window will show two addresses for the channel fader of the first fixture. I only found this last week when I wanted to pair dimmer channels under one fader.2 points
-
@Archie D has made this assumption because you have posted in FLX S. If you actually have a full FLX then recording a macro that is then triggered by OSC would be the way to go. However, all may not be lost if you are really on FLX S. You could record a cue that releases playbacks (see manual here) and then trigger that from OSC. A similar cue could also trigger all the cues you want to run. I'm not sure of the timings (whether releases are done before or after triggers) but you could even try putting all your releases and triggers on the same cue.1 point
-
Updated to 8.0.1 and used successfully without issue in three shows now.1 point
-
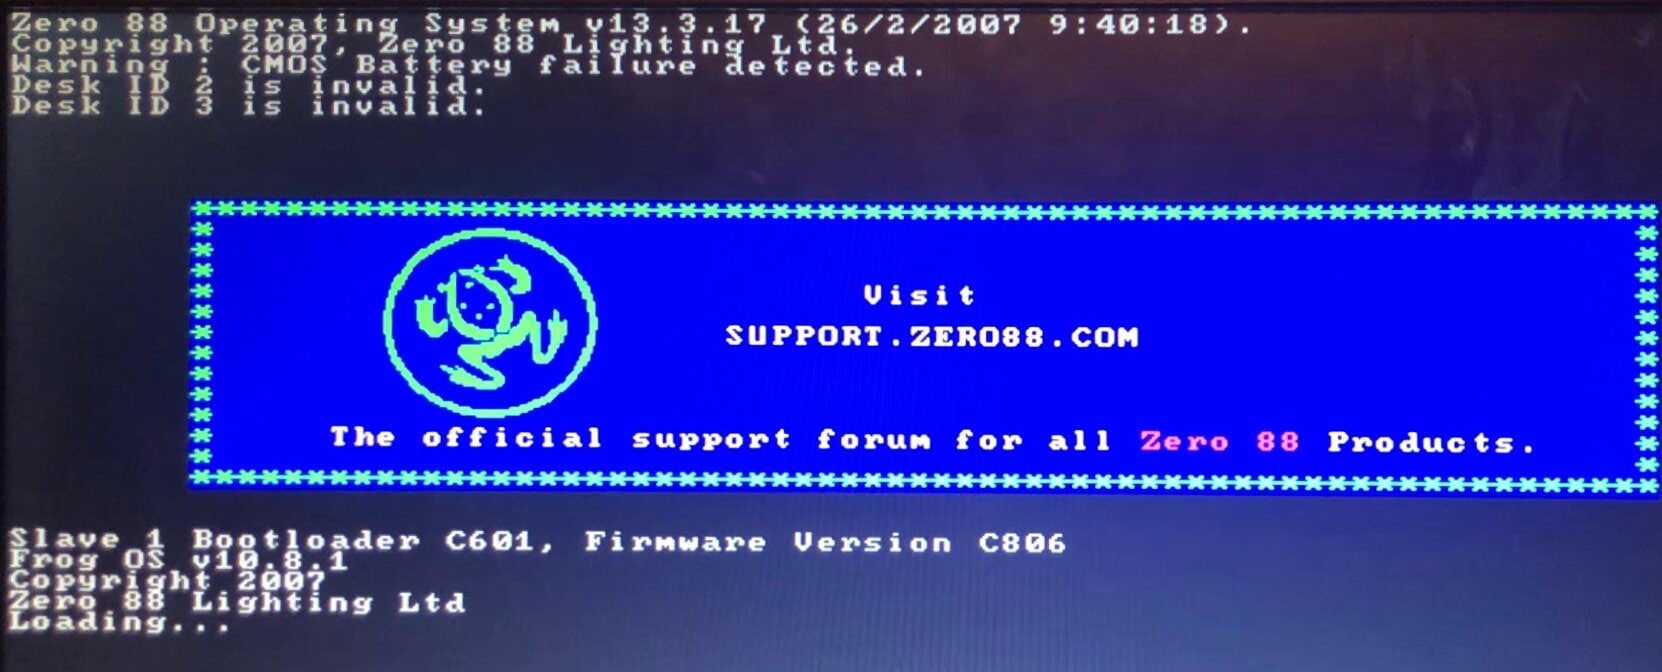
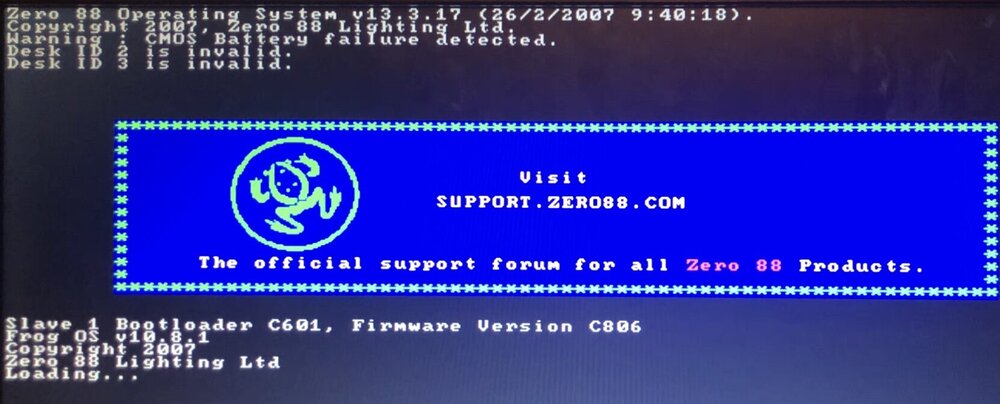
I agree with kgallen, this is most likely a battery issue. The battery is what holds the date and time along with the showfile data, so once the desk loses power it loses those if no battery is present. The time then resets and counts up from zero when powered on each time. Are you getting a message on the external monitor saying 'Warning : CMOS Battery failure detected.'? Following kgallen's advice - without attempting to reinstall the Frog Software, try powering on with a fresh battery and let the desk load into the memories screen, then cut power and turn on again. You should find that if the battery has been installed correctly, the second restart shouldn't show the 'Desk ID <number> is invalid.' message. As far as I know with the dipswitches on the channel fader PCBs, they are only used to tell the desk software which board is which. However, it would be a good idea while you've got the desk open to check they are in the correct position anyway. I hope this helps.
 1 point
 -
Don’t apologise - life gets in the way sometimes! I hope they’ve managed to sort the intermittent fault out. My JesterML had a ribbon cable that looked like the legs of the components on the front panel had pierced part of it. On the Blue Room, I assisted someone else identifying an issue with their front panel on a Jester 24/48. Their ribbon cable was pierced too. Seems like it might be a common thing? But not sure. Possibly could be solved by carefully cutting the component leg just below the solder joint while leaving a little bit of leg left, shortening the spike. That way the ribbon cable hopefully won’t suffer.1 point
-
@RJP / @DMH this looks like an FLX query rather than FLX S. Would you be able to move to the FLX forum? Thanks.1 point
-
Not used it yet as I was in final stages before show was due to start when it came out. I plan on trying it for next one though in a few weeks.1 point
-
Ah... Secret Squirrel releases now then is it... https://www.vari-lite.com/global/products/zeros-software https://vari-lite.s3.eu-west-1.amazonaws.com/graphics/technical/documents/ZerOS-8.0.1-release-notes.pdf1 point
-
All, I've read all the threads I can about default settings - but I'm still having issues with an intermittent flash to white when fading between cues. Worse if the fade is more than a second. FLX S24, V8 software, using playback 0 in a theatrical cue stack. All conventional dimmer lanterns are on page 1 and 3 - no issue with these. All LED fixtures are on page 2 for convenience. I select all by holding first channel button and pressing the last and then I can see RGBW on the inbuilt screen - moved these to 0, press 'Record', 'Home', 'Default'. Only it doesn't seem to work. Still getting the flash - but only sometimes not every fade which baffles me. Do I need to set default fixture by fixture...? Is there a way to look at the config of a fixture and see what the defaults are? At present I seems I can only overwrite the default - without seeing its present state. Any assistance would be gratefully received! Cheers Ian1 point
-
Good afternoon @Richard Elv, You can purchase a Phantom ZerOS Unlock Dongle from one of the distributors, or from here on StageGear. For outputting DMX with Phantom ZerOS, the Unlock Dongle must be plugged into your computer. If it is unplugged, DMX output will stop until the dongle is present again. Regarding methods of actually getting DMX out of your computer from Phantom ZerOS, you have two options. The first, is to output over the network using protocols such as ArtNet or streamingACN. The second, using a USB to DMX device (ones which support the ENTTEC protocol). Personally, I recommend the ENTTEC DMX USB Pro, which is generally considered to be a very high quality device and can be configured straight from ZerOS in SETUP -> Devices. Each of these devices will output one full universe of DMX. When running Phantom ZerOS as a FLX, you have access to 16 full universes of DMX (8192 DMX channels) over 64 patchable universes. If you're already used to using FLX, using a Phantom ZerOS Unlock Dongle will be ideal as it will give you the front panel you are already familiar with - just virtually. This can be used with a touchscreen, along with the external monitor for multi-touch functionality. Yes, the ZerOS Wing can be used with Phantom ZerOS running on a PC via USB as if you were using it with a physical console, therefore you will be able to use it across both your FLX and Phantom setup. Using a ZerOS Wing is the best option to give you more faders at one time. I hope this helps, Archie Bonjour @Richard Elv, Vous pouvez acheter une clé de déverrouillage Phantom ZerOS auprès de l'un des distributeurs ou directement sur StageGear. Pour la sortie DMX avec Phantom ZerOS, la clé de déverrouillage doit être branchée à votre ordinateur. Si elle est débranchée, la sortie DMX s'interrompt jusqu'à ce qu'elle soit reconnectée. Pour récupérer le signal DMX depuis votre ordinateur avec Phantom ZerOS, deux options s'offrent à vous. La première consiste à utiliser le réseau via des protocoles tels qu'ArtNet ou streamingACN. La seconde, à utiliser un convertisseur USB vers DMX (compatible avec le protocole ENTTEC). Je recommande personnellement l'ENTTEC DMX USB Pro, généralement considéré comme un appareil de très haute qualité et configurable directement depuis ZerOS dans le menu CONFIGURATION -> Appareils. Chacun de ces appareils génère un univers DMX complet. Lorsque Phantom ZerOS est utilisé comme FLX, vous avez accès à 16 univers DMX complets (8192 canaux DMX) répartis sur 64 univers patchables. Si vous utilisez déjà FLX, l'utilisation d'une clé de déverrouillage Phantom ZerOS sera idéale car elle vous permettra de retrouver virtuellement le panneau avant que vous connaissez déjà. Vous pourrez l'utiliser avec un écran tactile, ainsi qu'avec un moniteur externe pour une utilisation multitouch. Oui, la ZerOS Wing est compatible avec Phantom ZerOS installé sur un PC via USB, comme si vous l'utilisiez avec une console physique. Vous pourrez donc l'utiliser à la fois avec votre configuration FLX et Phantom. L'utilisation d'une ZerOS Wing est la meilleure solution pour disposer de plus de faders simultanément. En espérant que cela vous soit utile, Archie1 point
-
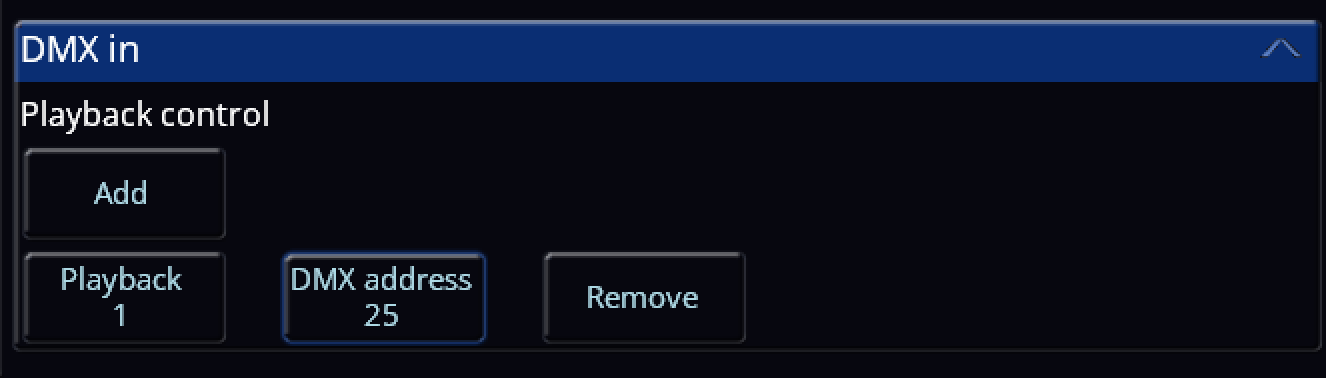
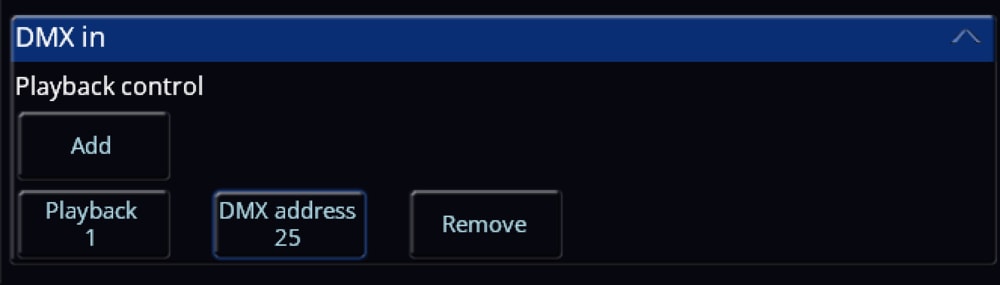
Hi @Richard Elv, Welcome to the Zero 88 Forum! Ultimately, it is highly recommended to use a ZerOS Wing to expand the available faders that can be used at one time on your console. However, using another console such as the FLX S24 is possible, but quite limited in comparison to a Wing. For instance, with this method, when you bring up a fader of a fixture on the FLX S24, it won't automatically be selected on your main FLX console, whereas on a Wing it interacts with the console and does select it automatically (depending on the 'Auto select channels' setting in SETUP -> Settings -> Operational -> Auto select channels). You also won't be able to do record, delete, SETUP + Tap playback button etc using the method described below, DMX Input. For using a FLX S24, you will need to configure one of your DMX output ports on the main FLX to be a DMX input instead. To do this, go to SETUP -> Universes, and tap 'DMX in' on the DMX output you wish to be a DMX input instead. On the FLX S24, you can patch in a bunch of dimmer channels (I recommend patching in the maximum available on ZerOS 8.0, which is 96). Then, connect the first DMX output port on the FLX S24 to your defined DMX input on the main FLX. You will need an adapter for the correct XLR connector to link the consoles together as they are both female XLR outputs. After this has been done, you now have a 'DMX In' column in your Fixture Schedule within SETUP. This lets you define a DMX In address for each individual fixture patched in, so when the console receives DMX data from the defined DMX input port (e.g. I raise channel 1 on the FLX S24 which has DMX address 1 -> FLX receives that data -> Fixture 200 in the FLX has a DMX input address of 1 -> Fixture 200's intensity raises), it will respond as configured. For playbacks, you can set a playback's DMX input address via SETUP -> Triggers -> DMX In. From there, you can tap 'Add' to add a playback to configure ready for DMX Input. In the example below (image attached), I have set Playback 1 on a FLX to be raised and lowered with DMX input address 25 coming from a FLX S24. I have done this so my first page of dimmer channels on the FLX S24 control fixtures, whereas the second page controls playbacks. (1-24 fixture control, 25-48 playback control). If you wish to use the Channels/Playbacks switcher button on the FLX S24, you could set up 96 dimmer channels (4 pages of dimming), use the first 72 (3 pages of dimming) as fixture control, but individually record each of the remaining 24 dimming channels at full as a playback each (playback 1-24), and on the main FLX you set the DMX Input address for each of your playbacks to the last page of dimming on the FLX S24. If you require control of more than 24 playbacks, you could go back further than the last page of dimming and use some of the third page too of the FLX S24. Overall, the ZerOS Wing has been designed to interact with the FLX or any other ZerOS console, and was produced for the reason of adding extra faders that can be used at one time. Using DMX Input is rather limited, so my recommendation is to use a Wing. But, I hope this helps, and if you have any further questions please don't hesitate to ask. Apologies for not translating, I figured if I did then this message would be colossal. Archie
 1 point
 -
I’ve got one of these. Make sure you are on a modern version of zeros and search for the showtec act fresnel 150 RGBAL. That is a library fixture. You can then edit it and rename to the act profile as it has an identical DMX patch. Let me know any problems. Link to the manual below if you’re not sure how to edit and rename fixture. The only thing you need to change though is the name. Also don’t use RDM or rigsync as that will complicate things. https://www.zero88.com/manuals/zeros/patching/add-fixtures/edit-export Brian1 point
-
Hi @DSUK73, Welcome to the Zero 88 Forum. Using a Phantom ZerOS Unlock Dongle unlocks the maximum amount of channels available for the fully upgraded console you are emulating (e.g. emulating a FLX will give you 8192 channels = 16 universes, emulating a Solution will give you 2048 channels = 4 universes). Any USB to DMX device that supports the ENTTEC protocol should work with Phantom ZerOS, I personally use the ENTTEC DMX USB Pro and have two of them. Each ENTTEC DMX USB Pro device will output a single universe of DMX. You can, of course, output DMX over Ethernet via your computer's network port for less cabling out of your PC if you have an Ethernet gateway. Once the USB to DMX device is plugged in, it can be configured in SETUP > Devices. This allows you to set the universe being output on that device, output rate, etc. Purchasing an Unlock Dongle is a great investment and I highly recommend it. I hope this helps, let me know if you have any questions. Archie1 point
-
My thanks gents & @Archie, I echo David's appreciation of your comprehensive response. I set Ch1 to Beam as a "Mode" channel on the thumb wheel & it's working as you suggest with values 9-135 controlling intensity but with all colours firing, overriding any colour parameter. Panto opens next week and I don't need a strobe so I'll leave it as I described in the OP for now. If I need a strobe I can come back here to confirm the sub-parameters setup. Many thanks Simon.1 point
-
@Archie D @Simonkbike Very thorough response as always Archie. If I've missed this in your post I apologise but I'd suggest ch1 should have a default value somewhere between 240 and 255. This is because my reading of the chart suggests this will be needed to make the virtual dimmer work.1 point
-
Just re-reading my initial post it’s a real dogs dinner! I’m glad @Davidmk and @Archie D have brought some clarity to the exercise with the neat use of a chase on the ‘master’ playback. Great work chaps!1 point
-
@kgallen No worries. My post offered no more than a hint, you went further and @Archie D has gone right into the detail. I think, between us, we've covered this at every level.1 point
-
This is a tricky one. Some years ago I attempted the same thing without much success. The problem is that you are fighting the principles of Last Takes Precedence. When you set the background rainbow that state is "last", if you then set another state (without removing the old one by lowering the background fader) that becomes "last" and remains in control as long as the fader is up. When you lower the new states fader (and as long as Release On Lower is on for that playback - this is the default) it releases that state and the background state becomes the "last" (unreleased) state. This rule applies to chases as well so, as each step executes, it sets a fixture to white and it remains white until the chase fader is lowered and the all steps in it are released. This means that the fixtures turn white and stay that way until they are all white. Normally each step in a chase (e.g. a red/white one) each step sets the new fixture to white and returns the previous (or all other) fixtures to red. But you can't do this because you want the colour from the old state and you don't know what that might be. Your issue then is how to release previous steps in the chase when the next step is executed. Things you can try... You can release things from a step, see Cue Settings -> Cue Macros in the manual https://www.zero88.com/manuals/zeros/cues-playbacks/cue-settings/cue-macros but I think this only works for playbacks not steps in them. Perhaps you could make a chase that triggers a different playback in each step? You could modify a Sparkle effect. You can only do this on an FLX so you'd have to set it up on Phantom ZerOS and then try running it on FLX S. See the manual at https://www.zero88.com/manuals/zeros/effects/waveforms. This is probably your best bet - unless someone else has a good idea. I'll be watching this thread as it's something I'd like to achieve but no longer have the will or time to spend on it.1 point
-
Same here, hazer and house lights are an absolute pain. I sometimes just have to give up with smart tag and use "SELECTED FIXTURES ONLY" if I need to change something whilst people are moving around the house for example. Would love an exclusion feature.1 point
-
Hi @barefootcoder, I'm assuming you're working on a Jester 24/48, or a 12/24? Unfortunately, this isn't possible on those consoles due to the trigger functionality not being present. You'll simply have to press the GO button twice quickly. However, the answer is different if you are on a console that's on the ML side of things (Jester ML, ML24, ML48). If you are on a Jester ML console, you can do the following: 1. Go to the cue that you'd like to then program addition cues to snap down and fade down. 2. Bring the fixture you'd like to snap down to an intensity of 0. 3. Ensure 'Down' is 'Snap'. Then hit Program to store that cue, after selecting which memory to record to. 4. Now bring the other fixtures down to an intensity of 0. 5. Define a 'Down' fade time. 6. Use the 'Special' tab on the front panel to tap 'Trigger'. This will change it to 'Auto', which will be an instant follow-on from the previous cue. You can then hit program again. In Run mode, after hitting the GO button on the snap-down cue, the fade-all down cue will automatically follow. An example of this is what I've created below, where cue 1 is the state where all those fixtures are up, cue 2 is bringing a single fixture down in a snap, and cue 3 is an auto-follow of a fade of 2 seconds bringing everything else down: I hope this helps.
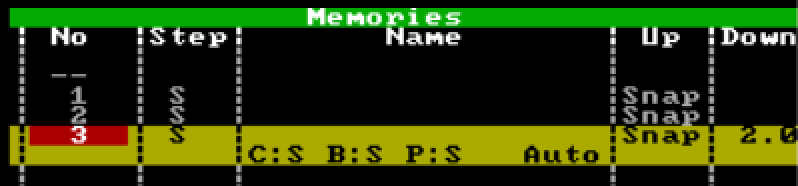 1 point
 -
Wir freuen uns auf die ersten 2026 ZerOS Workshops für die Vari-Lite FLX S Lichtsteuerungen. 24. Februar 2026 bei Focon Showtechnic, 49504 Lotte/Wersen bei Osnabrück - Infos & Anmeldung 31. März 2026 bei cast C.ADOLPH & RST DISTRIBUTION GmbH, 58099 Hagen - Infos & Anmeldung1 point
-
Hi @Alexandre, apologies for the late reply but I thought it was worth sharing this. Thank you for providing your show file. You're correct, the crash behaviour is related to Move on Dark being used in Playback 7. Upon further investigation of your show file, cue 3 in Playback 7 contains the 'Smooth' effect (E5 to be precise) applied to fixtures 2-9 and 49-54. After messing around with Move on Dark and only enabling specific attributes (position, effect, etc.), it appears that Move on Dark is looking forward in the cue stack (from cue 1 & 2) and is attempting to apply an intensity effect (Smooth) to fixtures that are at an intensity of 0 in that cue (essentially - those fixtures have no intensity values to modify by the effect / have had no intensity instructions as their intensities are not set in that cue and the previous ones - tracking is enabled). Note that 'Smooth' is an intensity based effect, which is likely the reason for the crash behaviour from what I can see. Instead of disabling Move on Dark generally for the whole playback, in ZerOS we have the option to disable certain parts of it, ensuring you don't lose out on any advantages of using Move on Dark e.g. with colour and position in sacrifice of effects to prevent crashing. To do this, you'll need to turn off the effect attribute for Move on Dark for the specific cue(s) that are causing you problems with Move on Dark so the console ignores any effects that may cause issues for that cue specifically. You could alternatively go the simple route - disabling effects in Move on Dark for the whole playback instead of just individual cues, but that will result in (for example) position based effects not being taken into account by Move on Dark, meaning effects such as 'Circle' won't be applied in dark - you will see them apply from 0 effect size to their defined effect size for that cue over the defined fade time as the fixture's intensity is brought up. You can, however, resolve this*. Disabling Move on Dark for effects only on specific cues: In the 'Settings' column in the cue stack, tap 'Add' on the cue you wish to disable effects with Move on Dark Tap 'Don't Move Effect' so it has a red indicator as opposed to a blue one (red is 'activated/selected', blue is not) Tap 'OK' Effects with Move on Dark has now been disabled for just that cue. When launching into this cue, effects will now be applied on the press of GO into that cue. You can do this for every cue that is causing a problem. Disabling Move on Dark for effects only on the entire playback: Hold the 'Setup' key on your console's front panel and tap your playback's flash button On the internal touchscreen (or monitor if using a FLX S48), tap 'Move on Dark' Tap 'Don't Move Effect' so it has a red indicator as opposed to a blue one *By enabling 'Don't Move Effect' for the whole playback in the playback's settings, inside each specific cue's settings referred in my first set of bulletpoints, that option will now have changed to 'Move Effect' (only for cues within that playback). This allows you to tell the console to look ahead in the cue stack and move the effect-based things for a specific cue anyway, ignoring the playback's general settings for Move on Dark that all effect movements are disabled. An example of this is shown in the image below in the far left column of options: I hope this helps, and I hope your FLX S continues to serve you well. Kind regards Archie
 1 point
 -
Same happens to me, but not for hazer, but for houselights. I would very much like that "exclusive playback" feature.1 point
-
I have long been asking for Exclusive Playbacks for the very same reason. This is what Edward Smith sent me back in March 2023: Exclusive Playback" faders are currently assigned to ZerOS 8 on our roadmap. Please note that this could move if our priorities change. If a playback is configured as exclusive, this would prevent it from being recorded into cues, even if recording with SmartTag.1 point
-
If you are operating with tracking options set to "Cue Only" or you have "Snapshot" enabled when you record then you have effectively told the desk to record everything. See manual here and here. In the Record Options, "SmartTag" enabled could record the hazer - if you changed one or more of its values in the programmer. For full control of what gets recorded you need SmartTag off. You can then select "Tagged Fixtures" which will record every fixture that has been changed or "Selected Fixtures" wich only records the currently selected Fixtures. See manual here. Cue Only, Snapshot & SmartTag all let the desk decide what to record, turning all of them off makes you decide but then you need to be sure you have included everything you want. Tagged Fixtures will generally get that right, with Selected Fixtures there is a risk that you will select a fixture, change it, de-select it, select another and change it then record - in this case only the 2nd fixture gets recorded. Essentially, the desk will do what you tell it but you need to understand what you've told it. There are videos in the linked manual references, these might help. To remove your hazer (or anything else) from a cue, select it, press Home then Update and select Remove. Hope that helps.1 point
-
@SimonH One of those occasions where I am glad to be wrong 😀1 point
-
It had been set to flash, rather than Go(Fade). I will set back after current show is finished. We have been running the show on one of the sub-masters which works fine. Thanks for the hint.1 point
-
I finally got a chance to try this yesterday and it worked! (A latched submaster with colours set to zero on affected fixtures.) Oddly, a few MFKs initially didn't work with it (either not coming up at all or affecting other lights they hadn't affected before) and I could find no difference at all between the ones that worked and the ones that didn't. But re-recording the ones that didn't work fixed them so I was happy.1 point
-
An ohmmeter won’t help you. The cables don’t have a different dc resistance they have a different ac impedance. The most practical way to tell is from markings on the sheath of the cable that will tell you it’s ’DMX’ or ‘digital’ cable maybe. If it says ‘microphone cable’ it’s not really for DMX use. You can use ‘DMX cable’ for microphones but ideally not ‘microphone cable’ for DMX. (My response coincided with David’s posting, I’ll read that now!).1 point
-
So now you are into something of a grey area - I fully expect this response to attract comment. It especially needs comment from a sound tech as I'm hazy about that side of things. You can often get away with audio cables for DMX but no-one in their right mind would recommend that because you might not get away with it and you can bet the problems would only be apparent mid show and not at fit-up. The easiest way to tell the difference is to see if it is printed on the cable . 150ohms is not the resistance of the cable it is the impedance. Cables do have a resistance but it is dependant on length and is only important if the cable is meant to carry a current (as in mains cables where it is very important and is part of PAT testing). As far as I can tell from researching it, DMX cables should have an impedance of 150ohm as you said). 110ohm is allowed but not recommended. I'm guessing, but I suspect anything below 110ohm is likely to cause problems. The standard for audio is 110ohm but there is a wide range in use - 60ohm to 150ohm is quoted. Apperently, the main thing for audio is that the source and cable should be low impedance and the sink should be high (e.g. 10,000ohms). I Googled "what is the correct impedance for balanced audio cables" and read the AI response to get this information. This would suggest that a "standard" impedance audio cable would be acceptable for DMX but the really low (below 110ohm) cables would not. You can measure the impedance of cables with the right equipment but you can't use the resistance range of a multimeter. Google "how to measure the impedance of a dmx cable" for ways to do it. Your physics lab techs might be of help in this area. Ultimately it is better to keep your audio and DMX cables apart and mark them with something obvious so you can put them away properly. (That's a big ask in a school I know.) There is a reason why the standard for DMX is 5pin XLRs even though it only needs 3pins and 3pin XLRs are cheaper.1 point
-
Is it CSC you are thinking of That would be it! Thank-you.1 point
-
OSC is really useful from my perspective for when you just want to run your show off one main control centre, but not having lights + sound (and possibly projection) all programmed in on a singular machine. If that one machine goes down, you've lost all lights, all sound and all projection. Whereas, if you run lights separately with the computer controlling sound and projection, while a lighting console is controlling LX separately, if the main computer goes down then you still have light on stage and can control that independently. Something like this can be done with OSC via QLab (with Network Messages) however QLab does require a license for this, or using something like Multiplay (another sound + projection cue-based tool) as @Neil Macmillan has used, is another option that is free to use (but still very very good!). So, if you are looking for a cue-based solution and you use a Mac, QLab is probably the best option (you could have a "magic sheet" as @Davidmk has, using Cue Carts within QLab). These "cue carts" can fire Network Messages over OSC to trigger certain cues on the LX console, like a soundboard but for lights. However, if you use Windows, Multiplay is also a good option (not sure about cue carts on it though). If you're on a Mac and instead of using QLab, you want to use Multiplay, you could run it via Wine but this won't run natively on your Mac and I'm not sure if OSC would work with how Wine handles things, but it could be worth a try. Unfortunately QLab on Windows isn't an option as it is developed primarily on the Apple platform, and so relies on Apple infrastructure for features such as AppleScript integration. QLab Network Message Cues - https://qlab.app/docs/v5/networking/network-cues/ QLab Cue Carts - https://qlab.app/docs/v4/general/cue-carts/ If you do use Multiplay, I very much point you to Neil's video! (I used it myself when having a play with OSC over Multiplay to my Phantom ZerOS setup, so thank you very much Neil for making that video). Best of luck with what you want to do with OSC.1 point
-
Good stuff. In my world it's mostly busking so I'm using TouchOSC to give me a "magic sheet" where I can select colours, positions, effects, whatever by touching a button. The buttons fire specific cues in cue stacks. For example, I might have a stack with cues to set colour (and only colour) on some wash lights. Each cue has a 2s fade time. The buttons each trigger one of these cues and, because it is a cue stacks, I get the fade and the old colour gets faded out. I also have a button that releases the stack so, for example, I can release the effects stack when I'm done with it.
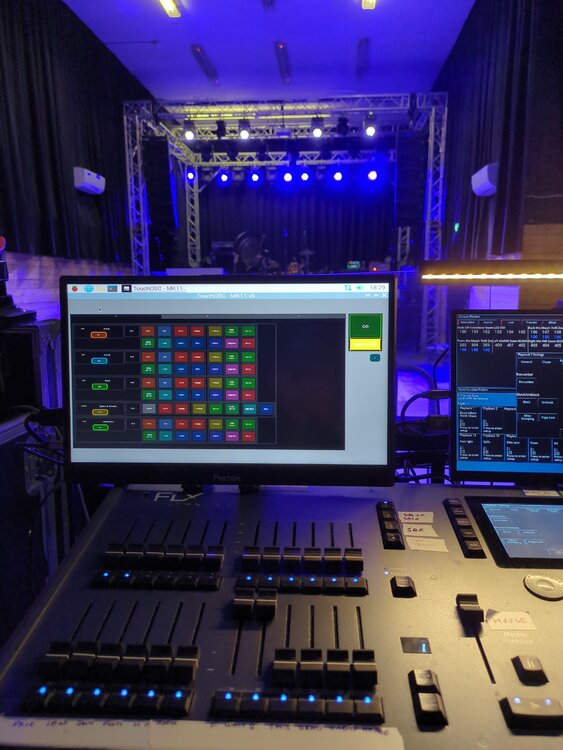 1 point
 -
Hi @Davidmk Of course you’re right - I just wanted to note that the use mode might be restricting what @ATC Tech might be trying to do if they’d opted for Cue Only thinking it would be ‘simpler’ but might be hampering them.1 point
-
Don't worry, with the page you provided me with the 'common' subdomain, there are workarounds 😉 https://backstage.zero88.com/a-z Thank you very much.1 point
-
I'll have a look when I get home (I fear I may have deleted my bookmark), but that's a good shout1 point
-
As far as I’m aware you can select the fixture and then edit with the on-console editor. https://www.zero88.com/manuals/zeros/patching/add-fixtures/edit-export1 point
-
hey denks for the answer. its a pity, that there are no plans for it anymore. good evening1 point
-
@Archie D @MD1125 You are out of my experience here. Nearest I've been was programming PDP11s 50yrs ago. No desire to return to that level of detail0 points